


Web application owners need to generate and submit certificate requests to secure traffic to their websites. Application owners often use IIS to generate or renew these requests. Occasionally, the original request will need to be altered by the Certificate Authority (CA) administrator before submitting the request to the issuing CA. Quite often, Subject Alternative Names (SANs) need to be added to the request. This is a common scenario because certificate requests generated in IIS do not provide the ability to add SANs in the requested file.
The Certification Authority Web Enrollment service allows authorized users to submit certificate requests to the CA interactively in a web browser. When this role is installed, users can browse a site like https://webca.example.com/certsrv to upload requests, download signed certificates, and download certificate revocation lists (CRLs).
Companies use the Web Enrollment service because of its simplicity. It provides two incredibly useful options. The administrator making the request in the site can choose both the CA template and add any additional SANs to the request if the AttributeSubjectAltName2 option is enabled. As we will see later, enabling this option introduces a big security risk. While the Web Enrollment service is extremely useful, it’s also fraught with problems.
The Web Enrollment service was released as part of Windows 2000 Server and is hosted in IIS. The service has not had any major updates since then. In fact, if you open the IIS manager you will see that the certsrv web application is written in classic ASP, the precursor to ASP.NET.
It’s generally a best practice to minimize the services running on an issuing CA, which means that ideally the Web Enrollment service should be installed on a separate server. With this configuration, Kerberos delegation is required. Often, an authorized user submitting the request will be a privileged user in Active Directory (AD). Privileged administrators should be prevented from using Kerberos delegation by being placed in the Protected Users group in AD and configured with the “Account is sensitive and cannot be delegated” flag in the User Account Control attribute. A properly secured privileged AD administrative account cannot request a certificate using the Web Enrollment service. If you must reduce an administrative user’s security to use a service, it’s probably time to look for a new solution.
CertReq.exe is a command-line tool that can be used for several tasks, including creating, submitting, retrieving, and installing certificate requests. CertReq.exe can replace most of the functionality provided by the Web Enrollment service. Two CertReq options to modify an existing request are discussed in this article.
The first possibility is to leverage the AttributeSubjectAltName2 option, which allows the requester to functionally edit the request before it’s submitted to the CA without any technical controls in place. This is the same option the Web Enrollment service uses. The problem with this approach is that nothing is stopping someone from adding an unsafe URL to any request for any template—even templates that have the client authentication extended key usage enabled. With this option enabled, it’s possible to use the CertReq.exe command-line tool to submit a certificate request and add a SAN with the DNS name of a domain controller, among many other nefarious possibilities. In short, the AttributeSubjectAltName2 option should never be enabled.
The Secure Option: Use an Enrollment Agent
Using an enrollment agent involves one or more individuals who are authorized to request certificates on behalf of users. An enrollment agent must have an enrollment agent certificate. Once the agent has the certificate, it can be used to re-sign and then submit requests to the CA.
Enrollment agents are typically used for issuing smart cards to users; however, they can also be used to modify and re-sign certificate requests. This is how an enrollment agent can be used to safely add SANs to existing requests with safe technical controls.
Creating the enrollment agent certificate template
Perform the following steps to configure and obtain enrollment agent certificates:
- Create a security group in AD called Web Server Enrollment Agents.
- Add users to this group who will be re-signing certificate requests and submitting them to the CA. This should be a very small group of people, and the group membership should be reviewed on a regular basis. It should be considered a “privileged” group in AD.
- Launch the CertSrv Microsoft Management Console (MMC) snap-in and connect to the issuing CA that will issue the enrollment agent certificates.
- Right-click Certificate Templates and choose Manage.
- Find the Enrollment Agent certificate.
- Right-click the certificate and select Duplicate Template.
- On the General tab, change the template name to “Web Server Enrollment Agent.”
- On the Security tab, add the Web Server Enrollment Agents group with Read and Enroll rights.
- Click OK.
Configuring a template to require agent signing
Perform the following steps to configure a template that requires enrollment agent signing:
- In the Certificates Template console, right-click the Web Server template and choose Duplicate Template.
- Configure the template with modern settings that meet your company’s security policies. Consider changing the compatibility, which will provide more options than the Web Server template.
- Name the template Web Server EA Required.
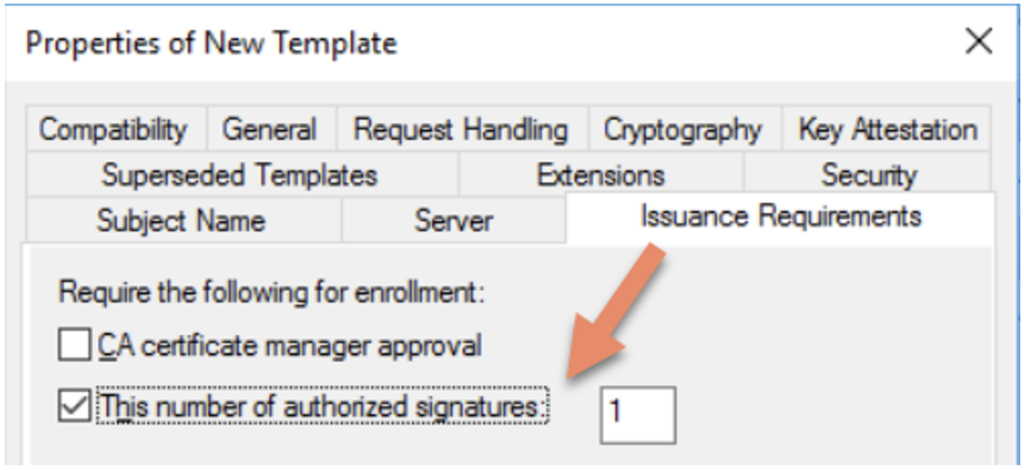
- On the Issuance Requirements tab, under Require the following for enrollment, select the This number of authorized signatures check box and enter 1.
Obtaining and using the enrollment agent certificate
Only members of the Web Server Enrollment Agents group can request and retrieve the enrollment agent certificate. As a member of the group, perform the following actions:
- Use the CertMgr (Certificates – Current User) MMC snap-in to request a new certificate.
- Under Certificates – Current User\Personal, right-click and select Request New Certificate.
- Walk through the wizard and select the Web Server Enrollment Agent template.
The user’s personal user certificate store will now include the certificate. Next, you must use the new certificate to add SANs to an existing request and submit the new request to the issuing CA.
To do so, use the CertReq.exe command-line tool. This tool has many capabilities and dozens of options. To get a basic list of options, enter certreq.exe /? on the command line. Two of CertReq.exe’s more common commands are Submit and Retrieve.
Safely Adding SANs
The rest of this article focuses on an option that isn’t used nearly as often but fits the bill for safely adding SANs to a request. This can be done by using the Policy parameter when running CertReq.exe.
First, you need to re-sign the request using the enrollment agent certificate and a policy file:
certreq -policy -config <CA Config> -cert <Enrollment Agent Thumbprint> OriginalRequest.req TempPolicy.inf UpdatedRequest.req
Second, you can submit the updated request and the CA will return the signed certificate:
certreq -submit -config <CA Config> UpdatedRequest.req SignedCert.cer
When using these commands, there are a few parameters to consider. First, the config parameter is essentially the name of the issuing CA you are submitting the request to. You can see all the CA configs in your environment by issuing the certutil -Dump command.
The thumbprint in the first command is the thumbprint of the enrollment agent. You can find the cert thumbprint using the following PowerShell command: Get-ChildItem cert:\CurrentUser\My
The last piece to the puzzle is the policy file. If an existing certificate request existed for example.andyland.dev and you wanted to add foo.andyland.dev and bar.andyland.dev with the WebServerEARequired template, the policy file would look like this:
[Extensions]
2.5.29.17 = "{text}"
_continue_ = "DNS=foo.andyland.dev&"
_continue_ = "DNS=bar.andyland.dev"
[RequestAttributes]
CertificateTemplate = WebServerEARequired
Note that it’s possible to list all the templates using the command certutil -CATemplates to see the name of the template you will add to the policy file.
Assuming the text above is in TempPolicy.inf, the following command can be used to generate a new certificate request with the additional SANs and the template:
certreq -policy -config CA-01.andyland.com\andyland-CA-01-CA -cert 6B2202A02686C82F33AA03074D37FB947BAB353B OriginalRequest.req TempPolicy.inf
UpdatedRequest.req
After that, you would submit UpdatedRequest.req using the certreq -submit command:
certreq -submit -config CA-01.andyland.com\andyland-CA-01-CA UpdatedRequest.req SignedCert.cer
Finally, the SignedCert.cer certificate can be sent to the administrator who provided the OriginalRequest.req file.
Summary
There are several ways to add SANs to certificate requests after they have been signed. Using the Web Enrollment service or CertReq.exe with the AttributeSubjectAltName2 option enabled is unsafe and not recommended. While it may be a bit more work up front, the more secure option of using an enrollment agent is worth implementing in the long run. The steps for using an enrollment agent can be adopted into a standard, repeatable process. Once that process is defined in your organization, you can automate the process with a PowerShell script.
Building, operating, and automating public key infrastructure (PKI) management tasks can be complex and at times overwhelming. Ravenswood Technology Group has PKI experts who can help. Contact us today.