


The Microsoft Azure portal includes a subset of permissions called protected actions, which can be used to manage Conditional Access (CA) policies and cross-tenant access settings. Protected actions are associated with an authentication context, which can be added to the scope of a CA policy.
The relationship between the authentication context, protected actions, and CA policy is shown in the following diagram:
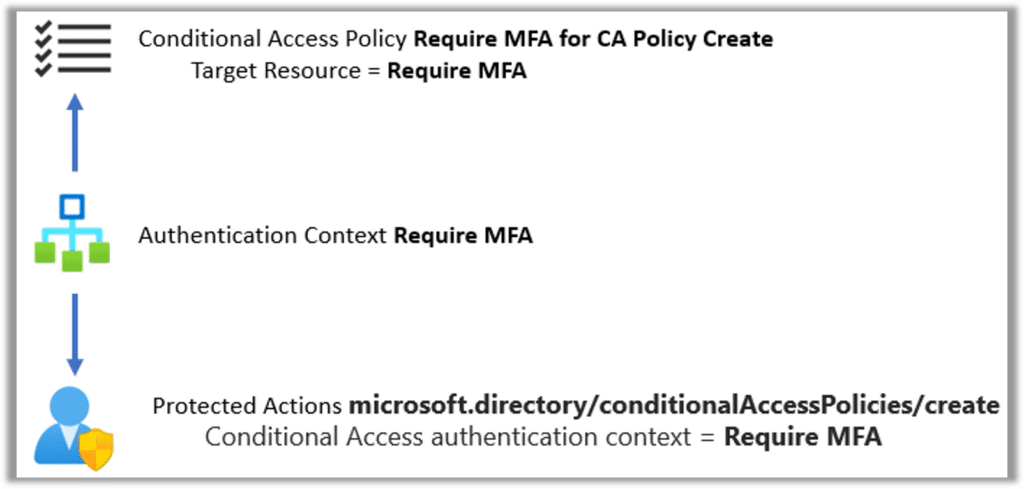
The authentication context “Require MFA” is the target of the CA policy “Require MFA for CA Policy Create,” which protects the conditionalAccessPolicies/create action since it is tagged with the “Require MFA” authentication context.
The following diagram illustrates protecting the creation of a CA policy using this configuration:
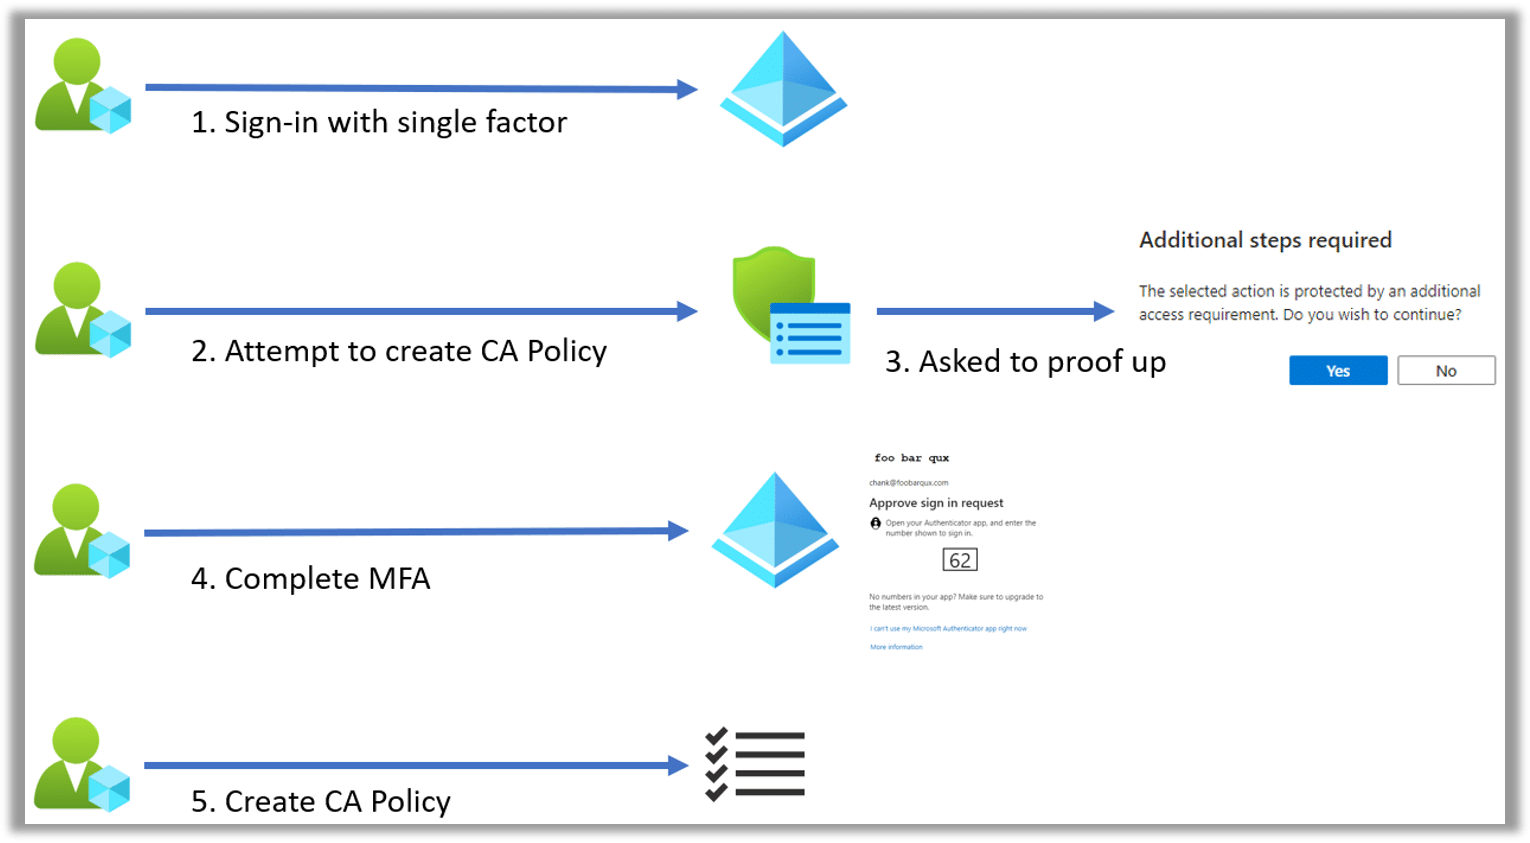
In this example, a CA administrator signs in to Entra ID using single-factor authentication (1). They then attempt to create a CA policy (2). Because that action is protected by a CA policy that requires multifactor authentication (MFA), the user is prompted to “proof up” (3); that is, perform an MFA (4) before they can create the policy (5).
Of course, this example is a bit contrived. A user with access to a privileged role, such as CA administrator, should never be allowed to sign in without MFA. We will look at some more realistic use cases later in this blog post.
Creating a Protected Action Conditional Access Policy
As mentioned in the previous section, there are three parts to creating a protected action CA policy:
- An authentication context
- The protected action(s) assigned to the authentication context
- A CA policy targeting the authentication context
The first thing you need to configure is the authentication context.
Authentication Context
An authentication context is simply a label that you can use to tag actions or operations in Entra ID protected applications so that you can bring them in scope of a CA policy.
Each authentication context consists of:
- A name
- An optional description
- An ID number (c1->c25)
- A check box to make the authentication context available to applications
The UI for adding an authentication context is shown in the following screenshot:
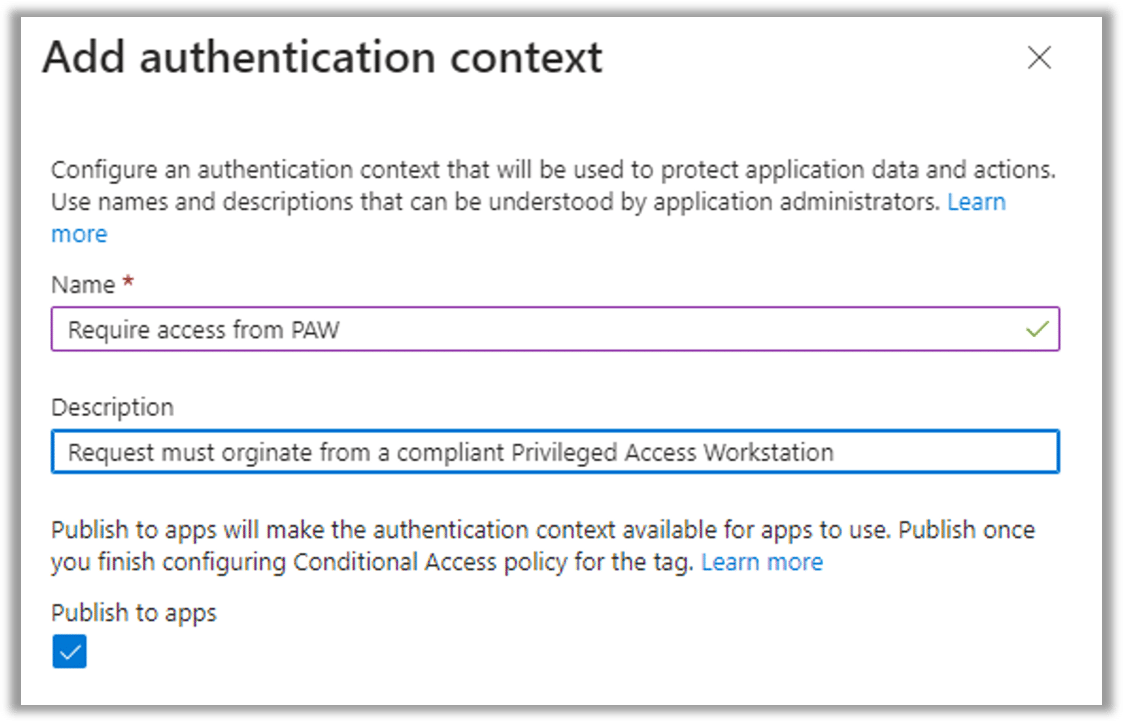
The ID is automatically assigned (though you can select a different one) and is shown purely for troubleshooting purposes. The name of the authentication context is used elsewhere in the UI.
The “Publish to apps” check box controls whether the authentication context is visible to applications or, in this case, the protected actions UI. You cannot assign a protected action to an authentication context until this check box is selected. Microsoft recommends that you check it only when the CA policy or policies that will target the context have been created, presumably to prevent administrators from assigning a context that does nothing.
In effect, the only real decision you must make when creating an authentication context is what to call it.
An authentication context is the link between a collection of policies and a collection of resources or actions. Therefore, you can name it after the policies it is used in or after the resources it protects.
There is a hard limit of 25 contexts that can be created. This means you will likely have to reuse contexts across non-related resources that share similar policy requirements. Thus, it is better to name the context after the intent of the policies it will be associated with.
For example, if we are creating a context for the CA protected actions to enforce that they are performed from a Privileged Access Workstation (PAW), we would be better off naming the context “Require Access from PAW” than “Conditional Access Protected Actions,” since we may want to add other resources (e.g., the cross-tenant protected actions) into the scope later.
Protected Actions
Protected actions are permissions in Entra ID that can be placed into the scope of an authentication context. A limited number of permissions are supported, as described in this Microsoft article.
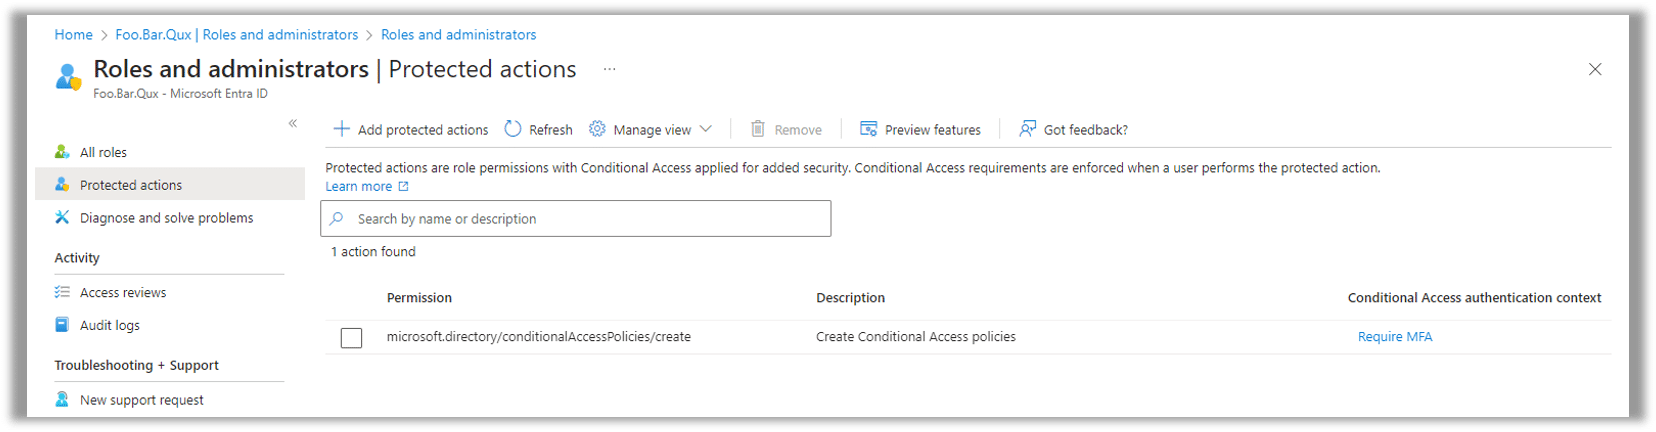
Protected actions show up in the Entra ID portal under Roles and Administrators | Protected Actions, as shown in the following screenshot:
Adding a protected action to an authentication context is simply a matter of clicking “Add protected actions,” selecting the context from the drop-down menu, and selecting the actions by clicking “Select permissions,” as shown in the following screenshot:
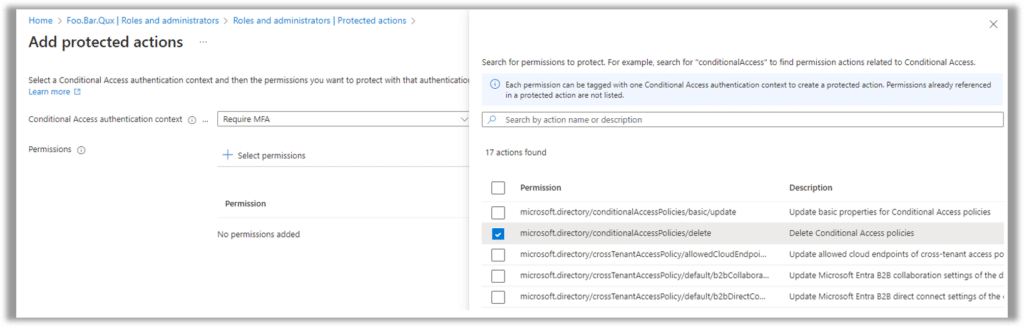
Each protected action can be associated with only a single authentication context, so if it doesn’t show up in the list, check whether it has already been assigned to a different context.
Conditional Access Policy
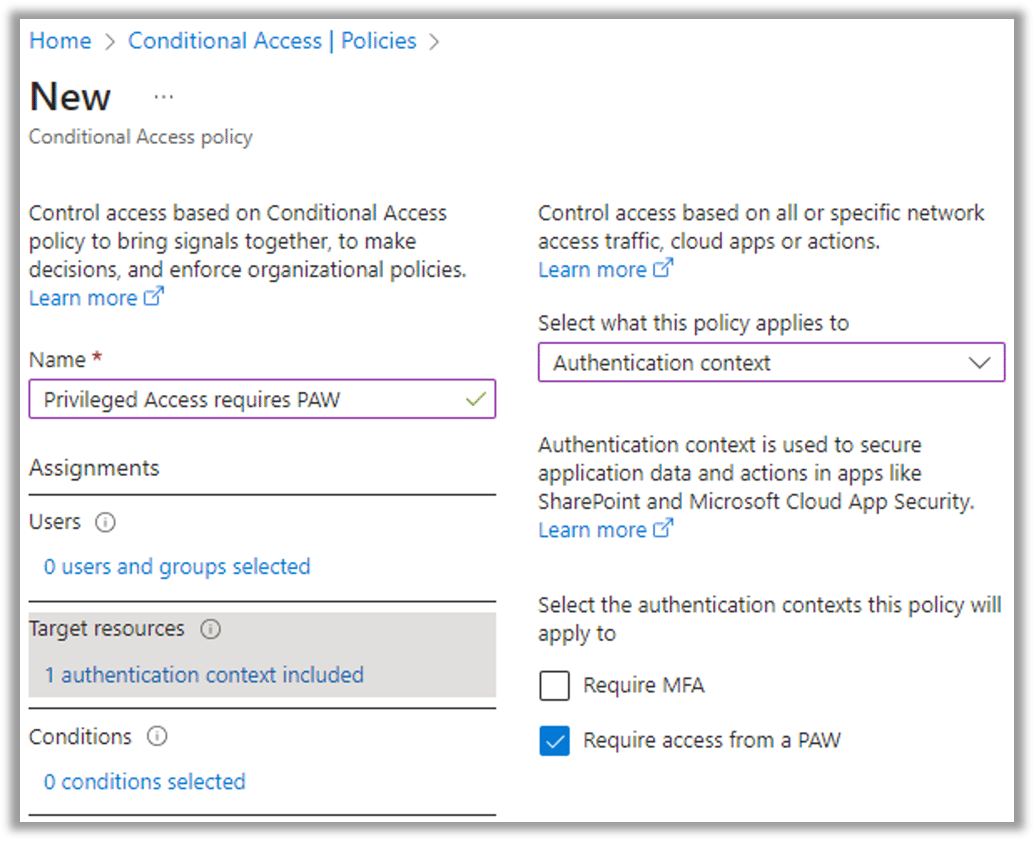
To associate an authentication context with a CA policy, simply choose “Target resources,” select “Authentication context” from the drop-down menu, and select the check box of one or more contexts, as shown in the following screenshot:
Protected Action Use Cases
Now that we know how to create a context, associate protected actions, and target a policy, what can we do with this new tool? Two common use cases include:
- Providing granularity of access within a role
- Layered defense
The first usage allows us to match the restrictiveness of our CA policies to the actions the user is performing, without creating role profusion. The second usage allows us to defend against accounts that may be mistakenly (or maliciously) granted access to privileged operations.
Granularity of Access within a Role
Our first example of a CA policy targeting protected actions was a CA administrator logging on with single-factor authentication and then being required to step up to MFA to create a CA policy.
This is clearly an unrealistic example; all your privileged roles should require MFA for authentication as the bare minimum. The example does illustrate the concept of providing more granular access within a role; that is, our example CA administrator was able to perform some actions without MFA, whereas others (e.g., creating a policy) required more authentication.
A more realistic example would be:
- The CA administrator role is assigned to CA policies that:
- Require passwordless MFA
- Require a managed device
- The CA protected actions are all assigned to an authentication context and targeted with CA policies that:
- Require phishing-resistant MFA
- Require a specific managed workstation that is marked as compliant
This setup would allow a CA administrator to perform low-risk activities (e.g., viewing CA policies) from a regular workstation, while requiring them to use a properly secured PAW for high-risk activities such as creating, updating, or deleting CA policies.
You can achieve this in other ways (e.g., by granting the user a lower-privileged role that has lower requirements for authentication), but that may necessitate the creation of custom roles and the management of the user in those additional roles.
This is not to say that this kind of granular access is the best approach. However, it is another way to balance ease of access to operational tasks against security. And it may be a fit for your organization.
Layered Defense
Most organizations create CA policies to target known privileged directory roles and known privileged accounts. But what happens if an account becomes privileged and manages to bypass these controls?
For example, someone could create a custom role and allocate cross-tenant access permissions to that role. The role would not automatically be included in existing CA policies, and any users allocated to it would not be subject to the kinds of restrictions we would require for a privileged user.
By allocating those same permissions to an authentication context and protecting appropriately with a CA policy, we defend against those permissions being used insecurely, no matter how they are obtained.
Summary
Protected actions and the ability to secure them via CA policies are another tool in an organization’s ability to guard Entra ID against compromise. For permissions that can be secured by protected actions, the approach shows promise for enabling the following scenarios:
- Providing granularity of access within a role
- Adding layered defense to privileged actions
If you need help in designing a CA architecture to secure your organization, contact the experts at Ravenswood Technology Group today.