


Restricting access to applications may be necessary for various reasons. For example, if an application is configured to provision a new user automatically upon first logon, unauthorized users may attempt to access the application and unknowingly cause licensing issues as their account is provisioned and they gain access. Disabling just-in-time (JIT) provisioning may not be an option in every case, so you may need a way to block users from accessing the application entirely. In this blog post I explain how you can implement claims-based application access control when Azure Active Directory (AD) B2C is federated with another identity provider (IDP).
There are numerous steps to implement application access control using claims. Once implemented, access control is quite simple to maintain.
IDP Integration
Modifications to your IDP and Azure AD B2C integration must be made so that your IDP will send a claim called “role.” If the role claim isn’t included in the token, Azure AD B2C will deny access.
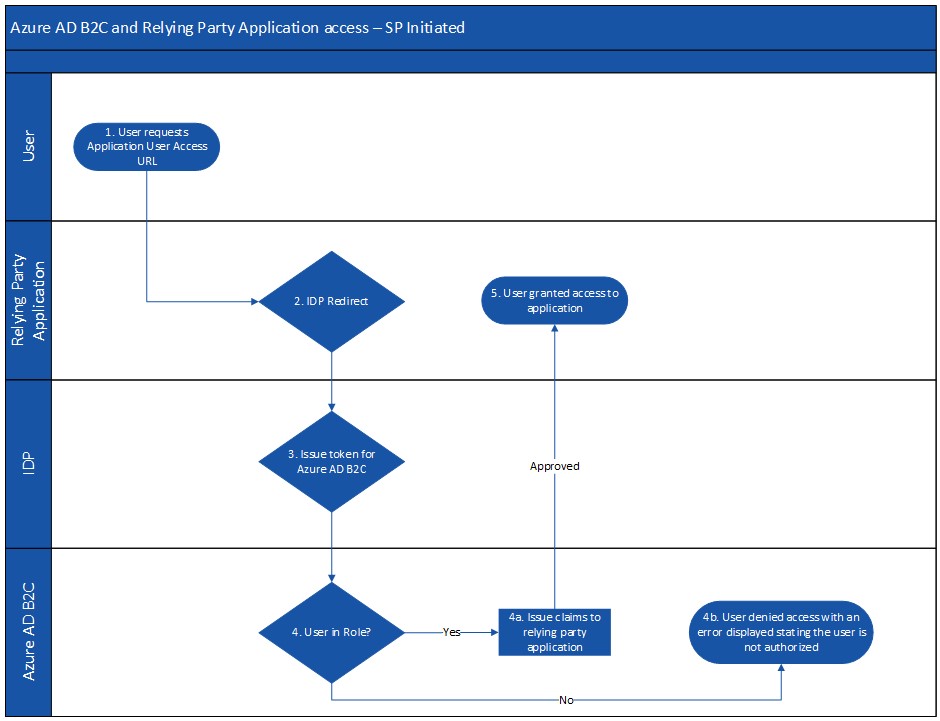
The flow diagram in Figure 1 provides details on how access is granted to a user for a service provider-initiated SAML relying party application, with details for each step:
- An end user attempts to access the relying party application using its access URL.
- The relying party application redirects the user’s request to the configured IDP.
- The IDP authenticates the user and issues a token for Azure AD B2C. The token includes the role claim that Azure AD B2C will use to authorize access.
- The relying party application launches successfully for the user.
Modify Azure AD B2C
This step will define three new claim types that are needed to support this configuration. The claim types must be defined at the top level of the Azure AD B2C configuration file hierarchy.
- roles – This claim stores the roles sent from your IDP. The PartnerClaimType in the example below is used in our example; however, your IDP may issue a different claim.
- isAuthorized – This claim stores a true or false value based on whether an authentication request is authorized.
- isAuthorizedErrorMessage – This claim is used when Azure AD B2C displays an error informing the user that they aren’t authorized.
- Modify the TrustFrameworkBase.xml file to include additional ClaimTypes for the roles and appropriate error messages.
- Add the sample below, creating three new claim types (roles, isAuthorized, and isAuthorizedErrorMessage).
<ClaimType Id="roles">
 <DisplayName>Roles</DisplayName>
 <DataType>stringCollection</DataType>
 <DefaultPartnerClaimTypes>
    <Protocol Name="SAML2" PartnerClaimType="http://schemas.microsoft.com/identity/claims/roles" />
  </DefaultPartnerClaimTypes>
</ClaimType>

<ClaimType Id="isAuthorized">
  <DisplayName>isAuthorized</DisplayName>
  <DataType>boolean</DataType>
  <DefaultPartnerClaimTypes>
    <Protocol Name="SAML2" PartnerClaimType="isAuthorized" />
  </DefaultPartnerClaimTypes>
</ClaimType>

<ClaimType Id="isAuthorizedErrorMessage">
  <DisplayName>There was an error</DisplayName>
  <DataType>string</DataType>
  <UserHelpText>Add help text here</UserHelpText>
  <UserInputType>Paragraph</UserInputType>
</ClaimType>
Code language: HTML, XML (xml)
Substitute the DisplayName of the ClaimType of isAuthorizedErrorMessage to an appropriate value. This will be displayed as the title of the error message to the end user, similar to Figure 2.

- Modify the TrustFrameworkExtensions.xml file to include a new ClaimsTransformation within the BuildingBlocks element.
- Add the sample below, creating three new claim types (roles, isAuthorized, and isAuthorizedErrorMessage).
- The Value you configure for the InputParameter will be displayed to the end user as shown in Figure 2.
- Add the sample below, creating three new claim types (roles, isAuthorized, and isAuthorizedErrorMessage).
<ClaimsTransformations>
  <ClaimsTransformation Id="CreateIsAuthorizedErrorMessage" TransformationMethod="CreateStringClaim">
    <InputParameters>
      <InputParameter Id="value" DataType="string" Value="Authorization failed - User not granted access" />
    </InputParameters>
    <OutputClaims>
      <OutputClaim ClaimTypeReferenceId="isAuthorizedErrorMessage" TransformationClaimType="createdClaim" />
    </OutputClaims>
  </ClaimsTransformation>
</ClaimsTransformations>
Code language: HTML, XML (xml)- In the ClaimsProvider for the IDP, modify the OutputClaims section by adding the sample below.
<OutputClaim ClaimTypeReferenceId="roles" PartnerClaimType="roles" />
<OutputClaim ClaimTypeReferenceId="isAuthorized" PartnerClaimType="isAuthorized" DefaultValue="false" />
Code language: HTML, XML (xml)
Upload the Modified Policies
The last step is to upload the modified or new policies. From the Azure AD B2C directory, perform the following tasks:
- Under Policies, select Identity Experience Framework
- Select Upload Custom Policy in the following order:
- TrustFrameworkBase.xml
- TrustFrameworkExtensions.xml
Modify Azure AD B2C Application Policy
Now that your IDP is sending the roles claim and Azure AD B2C can assign those roles to appropriate attributes, we can modify the application to interpret the roles. Perform these steps in the relying party policy for your application.
- Directly after the BasePolicy element, add the sample below.
- Update the Value for the InputParameter Id of “item” underneath the BuildingBlocks, ClaimsTransformations, ClaimsTransformation, and InputParameters elements to match the role value that the IDP sends. The purpose of the ClaimsTransformation is to detect whether the value exists in the claims sent by the IDP. If the specific role exists, B2C sets the isAuthorized claim to true; otherwise, isAuthorized remains false (as set by default).
  <BuildingBlocks>
    <ClaimsTransformations>
      <ClaimsTransformation Id="VerifyAADRole" TransformationMethod="StringCollectionContains">
        <InputClaims>
          <InputClaim ClaimTypeReferenceId="roles" TransformationClaimType="inputClaim" />
        </InputClaims>
        <InputParameters>
          <!-- Replace value with the value of the roles claim to check for -->
          <InputParameter Id="item" DataType="string" Value="SPApp" />
          <InputParameter Id="ignoreCase" DataType="string" Value="true" />
        </InputParameters>
        <OutputClaims>
          <OutputClaim ClaimTypeReferenceId="isAuthorized" TransformationClaimType="outputClaim"/>
        </OutputClaims>
      </ClaimsTransformation>

    </ClaimsTransformations>
  </BuildingBlocks>

<ClaimsProviders>
    <ClaimsProvider>
      <DisplayName>Verify Role</DisplayName>
      <TechnicalProfiles>
        <TechnicalProfile Id="Validate-Role">
          <DisplayName>Verify Role</DisplayName>
          <Protocol Name="Proprietary" Handler="Web.TPEngine.Providers.ClaimsTransformationProtocolProvider, Web.TPEngine, Version=1.0.0.0, Culture=neutral, PublicKeyToken=null" />
          <OutputClaims>
            <OutputClaim ClaimTypeReferenceId="isAuthorized"/>
          </OutputClaims>
          <OutputClaimsTransformations>
            <OutputClaimsTransformation ReferenceId="VerifyAADRole"/>
          </OutputClaimsTransformations>
          <UseTechnicalProfileForSessionManagement ReferenceId="SM-Saml-issuer"/>
        </TechnicalProfile>

        <TechnicalProfile Id="isAuthorized-Error">
          <DisplayName>User not authorized error message</DisplayName>
          <Protocol Name="Proprietary" Handler="Web.TPEngine.Providers.SelfAssertedAttributeProvider, Web.TPEngine, Version=1.0.0.0, Culture=neutral, PublicKeyToken=null"/>
          <Metadata>
            <Item Key="ContentDefinitionReferenceId">api.selfasserted</Item>
            <Item Key="setting.showContinueButton">false</Item>
            <Item Key="setting.showCancelButton">false</Item>
          </Metadata>
          <InputClaims>
            <InputClaim ClaimTypeReferenceId="isAuthorizedErrorMessage"/>
          </InputClaims>
          <OutputClaims>
            <OutputClaim ClaimTypeReferenceId="isAuthorizedErrorMessage"/>
          </OutputClaims>
        </TechnicalProfile>

        <TechnicalProfile Id="isAuthorized-RegError">
          <InputClaimsTransformations>
            <InputClaimsTransformation ReferenceId="CreateIsAuthorizedErrorMessage" />
          </InputClaimsTransformations>
          <IncludeTechnicalProfile ReferenceId="isAuthorized-Error" />
        </TechnicalProfile>
      </TechnicalProfiles>
    </ClaimsProvider>
  </ClaimsProviders>
Code language: HTML, XML (xml)- The last change needed is to modify the steps of the user journey to include the orchestration steps needed to evaluate the roles that the IDP is sending and then display an error message if the expected role isn’t found. To accomplish this, you’ll override the SendClaims orchestration step of your original user journey. Your updated user journey will include two new steps that occur before SendClaims, and then the final SendClaims step.
- Update the UserJourney Id to the UserJourney being used from the TrustFrameworkExtensions.xml file.
- Find the Order of the SendClaims orchestration step in your TrustFrameworkExtensions.xml file. Update the value of Order for the first new step below to match. This will result in the new step overwriting the original.
- Update the value of Order for the second new step to increment by one.
- Copy the original SendClaims orchestration step from your TrustFrameworkExtensions.xml file and update its Order value to increment by one.
  <UserJourneys>
    <UserJourney Id="SAMLSignin">
      <OrchestrationSteps>
        <OrchestrationStep Order="6" Type="ClaimsExchange">
          <Preconditions>
            <!-- Skip this orchestration step if the roles claim doesn't exist -->
            <Precondition Type="ClaimsExist" ExecuteActionsIf="false">
              <Value>roles</Value>
              <Action>SkipThisOrchestrationStep</Action>
            </Precondition>
          </Preconditions>
          <ClaimsExchanges>
            <ClaimsExchange Id="AADUserReadWithObjectId" TechnicalProfileReferenceId="Validate-Role" />
          </ClaimsExchanges>
        </OrchestrationStep>
        <OrchestrationStep Order="7" Type="ClaimsExchange">
          <Preconditions>
            <!-- Skip this orchestration step if isAuthorized doesn’t equal true -->
            <Precondition Type="ClaimEquals" ExecuteActionsIf="true">
              <Value>isAuthorized</Value>
              <Value>true</Value>
              <Action>SkipThisOrchestrationStep</Action>
            </Precondition>
          </Preconditions>
          <ClaimsExchanges>
            <ClaimsExchange Id="isAuthorizedRegError" TechnicalProfileReferenceId="isAuthorized-RegError" />
          </ClaimsExchanges>
        </OrchestrationStep>
      </OrchestrationSteps>
    </UserJourney>
  </UserJourneys>


Code language: HTML, XML (xml)
Test the Restrictions
If the user you’re testing with has the expected roles, they will be able to access the application as expected. However, if you test this functionality with a user who doesn’t have the expected role, you’ll receive an error message similar to the one in Figure 2. You can customize the error message by modifying the configuration for the isAuthorizedErrorMessage claim and the CreateIsAuthorizedErrorMessage ClaimsTransformation, discussed earlier.
Conclusion
Configuring Azure AD B2C with custom policies provides a wide variety of options to customize the solution for your specific needs. The experts at Ravenswood Technology Group are available to assist with your Azure AD B2C needs. Contact our team to see how we can help.