


In a previous blog post , we discussed taking advantage of Entra (formerly Azure Active Directory) Application Proxies to allow access to on-premises applications without a dependency on traditional tools such as a VPN. That blog includes a few great points that should be highlighted again. For example, in most organizations an Entra Application Proxy:
- Is secured using modern technologies and supplemental features such as Conditional Access
- Does not require additional inbound firewall rules
- Can be accessed using the same URL internally and externally
- Is dynamic and easily modified if required
- Is easy to configure with high availability
- Is user friendly

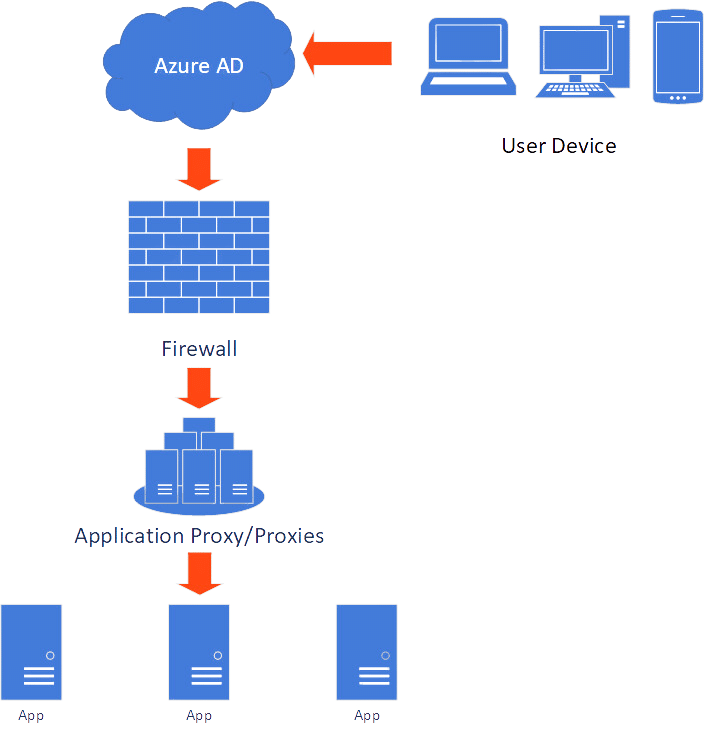
- A user sends a request to the application.
- Entra ID requires the user to be authenticated and prompts for authentication and additional controls if configured.
- If the authentication succeeds, the request is sent to an on-premises Entra Application Proxy.
- The Entra Application Proxy service then typically uses Kerberos constrained delegation (KDC) to authenticate to the app on behalf of the user.
- The request is returned, and the user interacts with the application the same as if they were on premises.
In this blog, we will expand on the previous post . We will install and configure a single Entra Application Proxy. We will then establish a connection to allow external access to our internal application, in this case a Zabbix instance. Finally, we will configure a Conditional Access policy to require multi-factor authentication (MFA) to authenticate our application.
Requirements
Partner with Microsoft experts you can trust
If it’s time to take that first step toward leveling up your organization’s security, get in touch with Ravenswood to start the conversation.
You will need the following in your environment to configure an Entra Application Proxy:
- On-premises web-based app
- Ability to create new internal and external DNS records
- A Microsoft Entra ID Premium subscription
- An account configured with the Application Administrator role
- Users within Entra ID who will have access delegated to them
- A dedicated server running Windows Server 2012 R2 or later to host the Application Proxy
Note: This guide was written and captured using Windows Server 2022 R2, but other Server OS versions more recent than 2012 R2 will work. The Application Proxy can also be configured using a Server Core OS, but this is outside the scope of this blog post.
You can review the requirements in more detail in Microsoft’s Entra Application Proxy documentation.
Creating and Populating Azure Groups
Access to the applications behind the Application Proxy is delegated by group and user assignments. The simplest way to delegate access would be to manually assign users to each app, but this process can be tedious and pose problems for life cycle management. If you are syncing your on-premises AD through Entra ID Sync, you can create groups within AD to delegate access or go cloud-only and take advantage of features such as dynamic groups.
In this example we will create a simple group and manually add test users to access the application. You can also use an existing cloud group or a group synchronized from your on-premises AD.
To create the group:
- Navigate to portal.azure.com > Entra ID.
- Select Groups.
- Select New group.
- Leave the Group type as Security.
- Give a meaningful name and description to the group.
- Leave the Entra ID roles can be signed to the group setting as No.
- Leave the Membership type setting as Assigned.
- Under the Members and Owners links, assign the members and owners as desired.
- When you are satisfied with your changes, click Create.
Your group is now staged and ready for use when you configure your first application.
Installing Entra AD Application Proxy
The first step to getting your applications configured to use the Entra Application Proxy is to install the Application Proxy itself.
To download the Application Proxy installer:
- Navigate to portal.azure.com > Entra ID > Enterprise Applications > Application proxy.
- Select Download connector service.

- Select Accept terms & Download.
- Copy the AADApplicationProxyConnectorInstaller.exe file to the server you want to install the Entra Application Proxy on, and run the installer.
- Accept the terms and conditions and select Install.
- If prompted by your browser, add the Microsoft URLs to the trusted sites zone.
- If prompted to run scripts, select Yes.
- In the Microsoft Azure sign-in window, authenticate using an Entra ID account granted the Application Administrator or Global Administrator role.
- Once the setup is complete, you can close the window and return to the Enterprise Applications window on the Azure Portal. After a few minutes you should see the new Application Proxy populated in Azure.
Creating Your First Entra Proxy App
Now that you have your Application Proxy installed and running, you can configure your first application.
- In the Enterprise Applications window, select Configure an app.

- In the Internal URL field, enter the URL you would normally use to access the application. If possible, it’s highly recommended to use an https:// URL with a valid certificate to ensure that traffic between your Application Proxy and the application itself is encrypted.
- In the External URL field, enter the URL you would like to configure for external access. Domains you have verified will be options to select from. If you’re using a custom domain, you’ll see a notice showing required DNS CNAME records. Note these records for later use.
- Users will use the Pre-Authentication process to gain access to the application. Passthrough allows for direct access to all users through the proxy. Entra ID will force user authentication before they are allowed access to the application. For our configuration, select Entra ID.
- Click Advanced to open the advanced properties menu.
- In the Backend Application Timeout additional setting, leave the default setting of Default. You can change the setting to Long if you experience disconnects due to timeouts.
- Click the HTTP-Only Cookie setting checkbox to enable the Use HTTP-Only Cookie setting. Disabling this setting is required for some configurations, such as RDS gateways, but it should be left enabled if possible to protect against cross-site scripting.
- Set the Use Persistent Cookie setting to your preference. This setting will allow the cookie to not expire when the browser session is closed.
- You may need to modify the Translate URLs In settings, depending on your application. These settings can be left on the default of Headers: Enabled and Application Body: Disabled, although you may need to conduct testing specific to your application.
- Once you are satisfied with your settings, click Create.
- As an optional but highly encouragedstep, navigate to your application and select Application Proxy. In the Basic window is an option to upload a valid PFX file and a password for the file. The PFX file should either be issued to or contain Subject Alternative Names (SANs) for your external URL used to access the app.
- Update your DNS settings with a CNAME record pointing your external URL to the Microsoft msapproxy.net URL provided in Step 3. Remember to update both internal and external DNS records. An example of a properly configured NS record lookup using nslookup zabbix.ad.labgrassa.com can be seen below.

- While you wait for DNS to propagate, navigate back to the app page and select Users and groups.
- Select Add user/group.
- In Users and groups, select the group you configured for access earlier in the guide and click Assign.
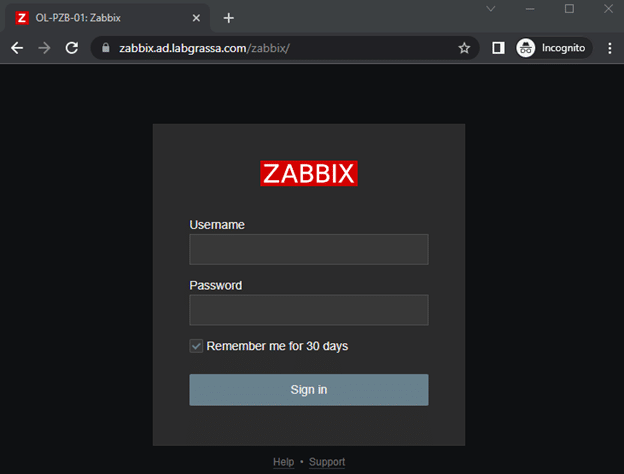
- Once DNS has had time to propagate, you can attempt to access your application by opening an incognito browser session and navigating to your external URL.
- You should be presented with a login.microsoftonline.com credential portal. Enter credentials for a user assigned to the application.
- Eureka! You are authenticated through Azure and able to access the application as seen below.
Utilizing Conditional Access Policies
Now that the application is available through Azure, you should enhance your security configuration by enabling a Conditional Access policy . Although an in-depth configuration is outside the scope of this article, you can add a simple configuration such as requiring two-factor authentication.
- Navigate to portal.azure.com and select Entra Conditional Access.
- Select New policy.
- Give the policy a meaningful name.
- In Users or workload identities, select Include > All users.
- In Cloud apps or actions, select Include > Select Apps and choose your application.
- In Access controls > Grant, select Require multifactor authentication and Require all of the selected controls.
- Change Enable policy to On.
- Click Create.
Two-factor authentication is now required every time a user attempts to access the application.
Note: This only occurs through the Application Proxy. Users navigating to an internal URL will bypass the Application Proxy and thus Conditional Access entirely.
Final Notes
Once you set up an Application Proxy, adding new applications and securing them through Conditional Access provides users with high convenience and security without having to rely on technologies such as a VPN. Just about any app served through a browser can be configured for access through an Application Proxy. There are a few features that we didn’t touch on but that are worth exploring, such as configuring Application Proxy groups for apps kept in different sites or locations. Additional technologies such as Security Assertion Markup Language (SAML), can be utilized to allow for single sign-on (SSO) to applications protected by an Application Proxy. Redundancy is also extremely easy to configure; it’s as simple as spinning up a new Windows server and installing the Application Proxy software.
If you’re looking for advice on configuring or managing your Application Proxy, reach out to Ravenswood today! Our experts are here to help.