


There are a few key terms that are critical when understanding and deploying Microsoft Information Protection (MIP). For example, sensitivity labels give you a way to classify and protect data by using visual markings, protections such as encryption, and restrictions on data access. You can extend sensitivity labels to include Microsoft Teams, Microsoft 365 Groups, SharePoint sites, Power BI, and third-party apps and services. Label policies include a group of sensitivity labels to make available to your users. They also have additional configuration options for deployment.
Markings
When you apply a sensitivity label to a document or email message, a variety of markings are available for visual identification (e.g., header, footer, watermark). Customizations are available for font, color, and the text you would like to have written. Figure 1 shows these marking options. Many clients use one or more of the available markings to identify confidential or restricted content.
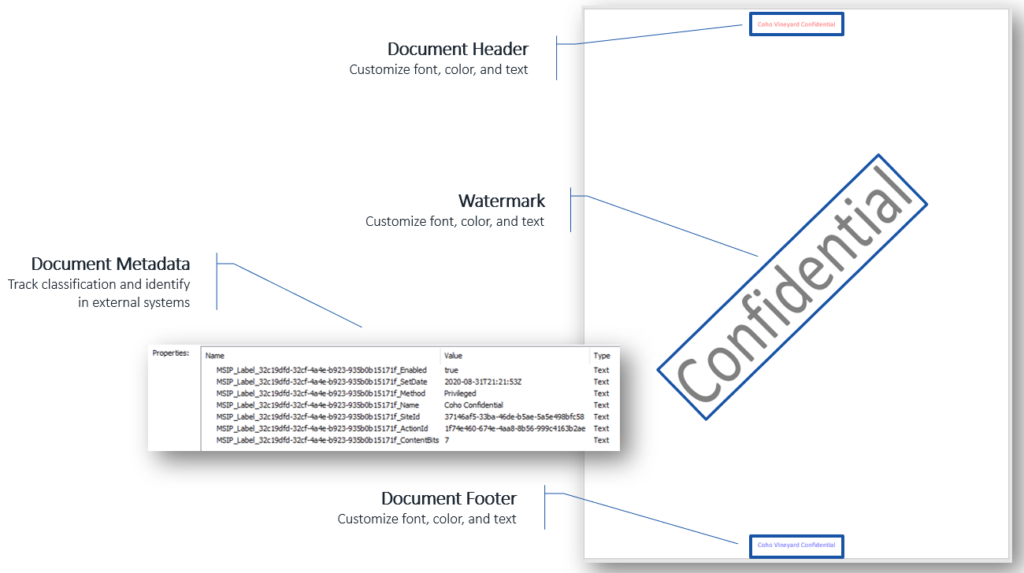
Behind the scenes, when you apply a sensitivity label to content, metadata is written to allow for tracking as well as identification within an external system. This metadata can be used by other Microsoft services such as Exchange Online, as well as third-party tools and systems. Although the visual markings are optional, this metadata is managed in the background and isn’t customizable. It’s required for MIP to function correctly.
Protections
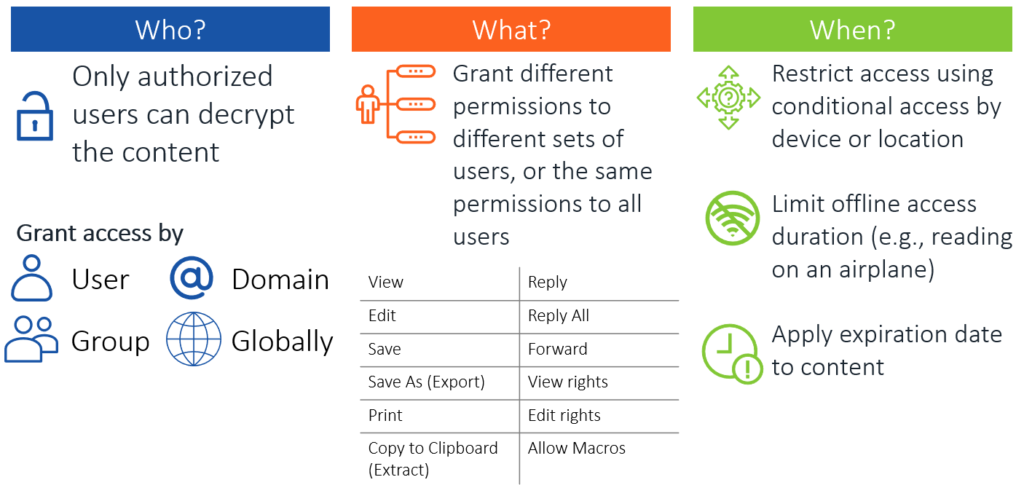
Whereas content markings apply visual markings, protection options allow restrictions to be applied to the content, including encryption and granting permissions for specific actions. These restrictions can be grouped into three categories:
- Who: Content can be encrypted to prevent unauthorized or unintended access.
- What: Content can be encrypted to prevent unauthorized or unintended access.
- When: Conditional access policies in Entra ID (formerly Azure Active Directory) can be used to restrict access by device or location (e.g., allow access only from corporate managed devices within an office location).
Figure 2 summarizes these restrictions.
Offline access is an important protection to consider. When you create a sensitivity label, offline access is set to Always by default, which results in users being granted permanent offline access. Although this may sound good like a good idea, your ability to revoke access to content can be limited in certain circumstances. One example is that when a user is connected to the internet, the user’s Microsoft Office applications will periodically verify that the user still has the authorization to access the content. If no limit for offline access is in place, then while the user is offline, they can continue to access the content indefinitely without any restrictions. However, if a limit is put in place—for example, seven days—then after seven days of the device being offline, the content will no longer be available to access until the user connects to the internet again to let the software reverify authorization. For companies with users who travel and are offline often while they work, this is important to plan correctly so your content stays protected but is also accessible as needed.
Another option to select is an expiration date. Although this option is used less often than limiting offline access durations, it can be useful if you need to place a fixed expiration date on the content. This option is a time bomb of sorts; once the expiration date is reached, the content isn’t accessible to anyone other than the content owner.
Advanced Label Options
Creating sensitivity labels and label policies using the Microsoft Office 365 Security & Compliance portal gives you several standard options to customize. However, there are numerous additional options available via PowerShell configuration. Many of the options that are available only via PowerShell are extremely useful and commonly used. None of these options are required, but they can assist with user adoption. They also provide features that allow for more seamless operation in a MIP deployment. The full list of available options is available in the Microsoft documentation; the following is a small selection:
- Attachment Action: When a user creates a new email message with no sensitivity label assigned and attaches a protected document to it, this option will display a recommendation to the user to protect the message. Alternatively, the option can be configured to automatically apply the protection without displaying the recommendation.
- Attachment Action Tip: In combination with the Attachment Action option using a recommendation, a custom tooltip can be used instead of the standard Microsoft tooltip.
- Color: A color can be associated with each sensitivity label configured. These colors are displayed in the Sensitivity menu of your Office applications and can help users select the appropriate label. For example, you can set public access to green, confidential access to yellow, and restricted access to red to help provide users with an additional visual indication of what is considered safe versus not safe. Any color can be used; colors are set by using the RGB hex value.
- Hide Toolbar: If you install the MIP unified client on your workstations, the toolbar will be hidden by default—although the Sensitivity button will be displayed for use. Changing this setting allows you to force clients to always display the Information Protection bar.
- Warning/Justification/Block: Each sensitivity label can have a warning, justification, or block policy associated with it. When these policies are enabled and the appropriate domain list is applied to each of the three policies, actions are taken whenever protected content is sent to any domain not included in the list. The warning policy will merely display a warning that a user is sending protected content to a domain that isn’t trusted. The justification policy is similar; however, instead of just a warning, the user is required to enter a statement explaining why they are sending protected content to an untrusted domain. The block policy is the most restrictive and will prevent the user from sending protected content to the untrusted domain.
Review, Then Plan
When deploying an MIP solution in your environment, the largest part of the project is reviewing the requirements and then planning. The configuration process itself is straightforward, with few complications, if adequate planning is done beforehand. In Part 2 of this blog, we’ll take a look at planning an MIP sensitivity label deployment.
If you need help with planning a project to ensure its success, contact the experts at Ravenswood Technology.