


In Part 1 of this blog post, we looked at what goes into thinking about and designing your automated access policies. As discussed, we want to first think about our policies in “natural language” before we dive into the technical implementation. We also covered the dynamic membership rules feature in Entra ID (formerly Azure Active Directory) that we can use to help implement these policies.
In this blog post, we’ll learn how to implement two policies:
- All employees on the identity and access management (IAM) team
- All employees who work in the medical center and have completed HIPAA training To carry out this implementation, we’ll use dynamic membership rules in Entra ID that can then be assigned to any Microsoft 365 resource or used to grant access to a particular set of applications.
Let’s get started with a simple example.
Example 1: All Employees on the IAM Team
In this example, we have an Entra ID implementation in which the department has been set for most of the users in the directory. The organization uses a format of <Department>/<Team>, so we have some options for working with this data with a dynamic membership rule. Not all users have this value set, which is fine for working with dynamic memberships. To start using dynamic membership rules, first create a group like you normally would in Entra ID—but under Membership Type, select Dynamic User. Note that if you are using this group for Entra roles, the membership type cannot be changed to dynamic and must be statically maintained. Click “Add dynamic query.”
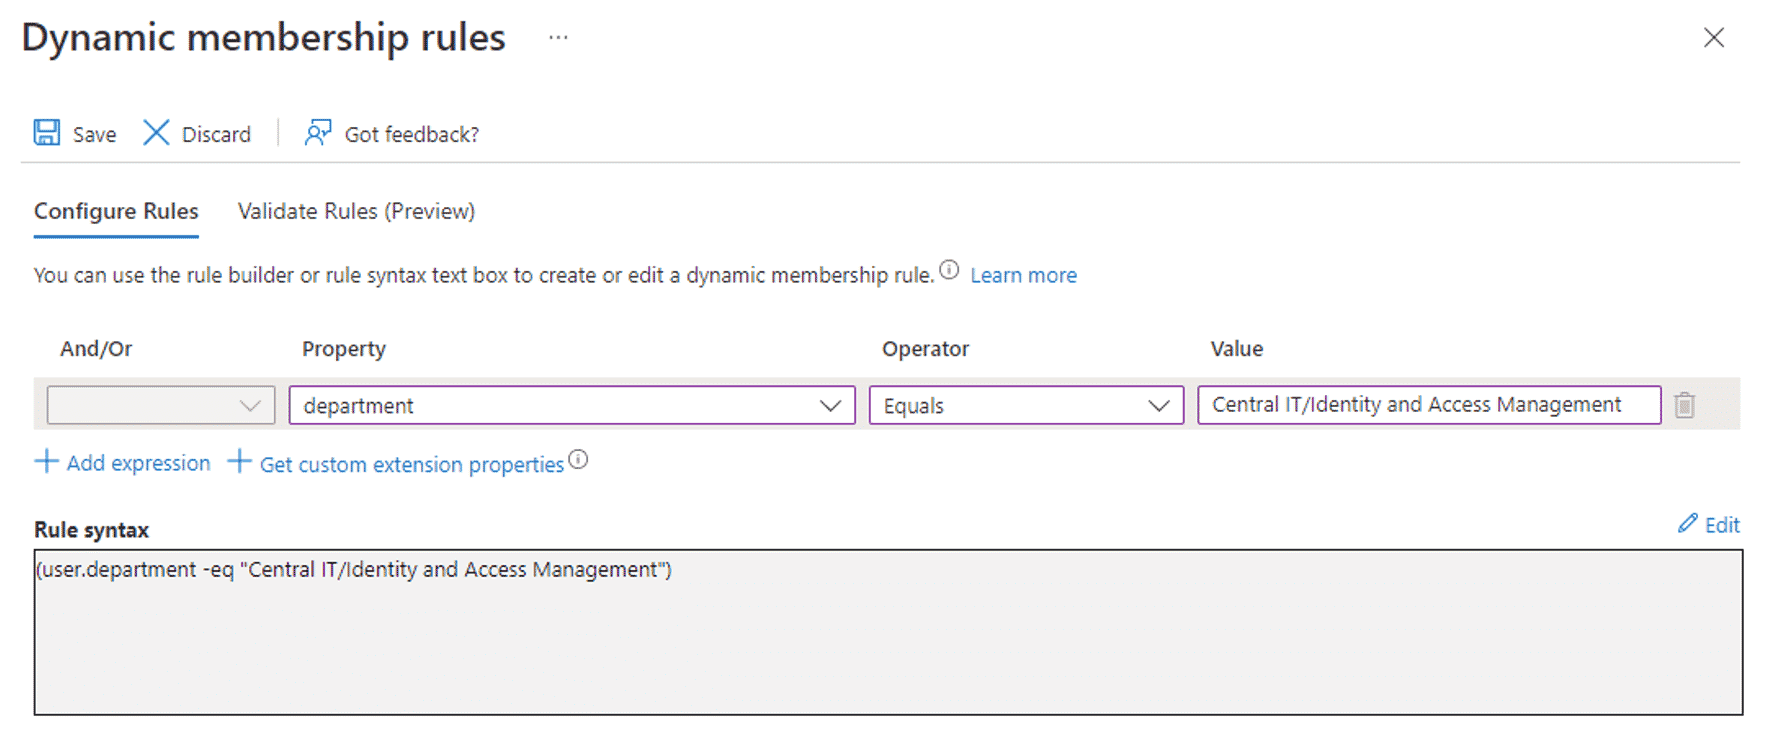
Dynamic Membership Rules Editor
Selecting “Add dynamic query” will take you to the dynamic membership rules editor. In this simple example, we are just looking for an exact value of “Central IT/Identity and Access Management” in the department attribute, as the following screenshot shows.
You do not need to create the group to validate that your membership rules are working as intended. Clicking the Validate Rules tab will take you to a window where you can add a select set of users and validate whether or not a user would end up in a group.
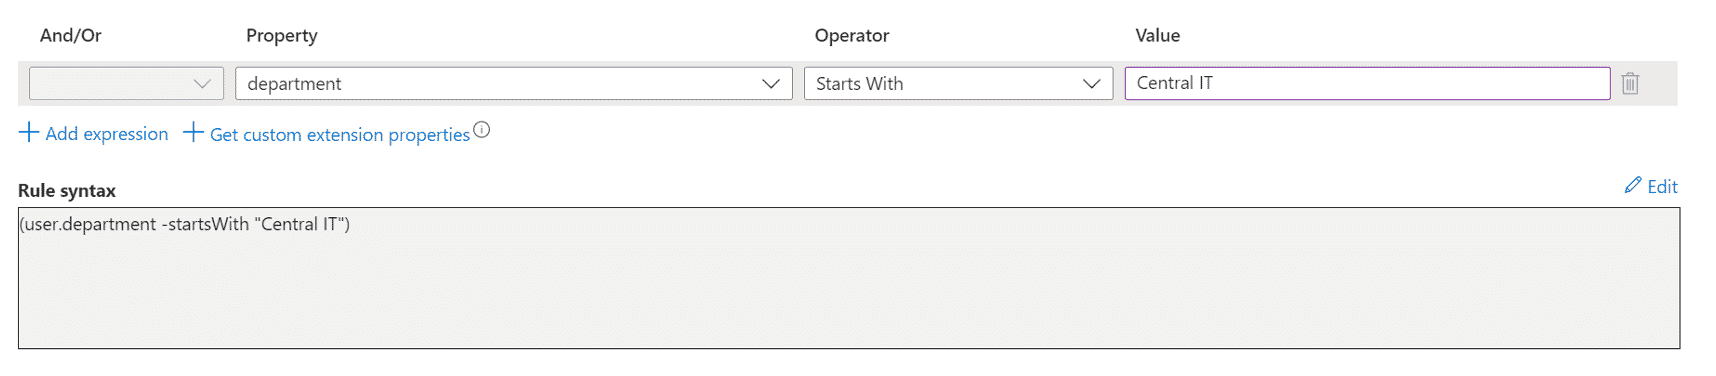
But suppose you actually wanted all of the Central IT employees instead of a specific team. Then, you could change the membership rule to simply match any string starting with “Central IT” if you wanted to create a group of all employees in Central IT. The following screenshot shows an example.
Note: You can edit the dynamic membership rules after a group is created. You do not need to recreate the group if your business rules change and you continue to use the same group.
Once you are done creating your rules, click Save. Finish creating the group as you would any regular Entra group.
Validating the Group
Even though you just created the group, you will see that it has not populated yet. On the Overview pane of the group, you will see two important boxes: “Dynamic rule processing status” and “Last membership change.”
Since membership changes are handled asynchronously in the background and can take up to 24 hours in large tenants, this is a quick way to see if your group has refreshed or not when looking for missing (or extra) members. In a smaller tenant, you can usually expect the group membership to update within a few minutes.
Now let’s move on to a more complicated example where we use two attributes (including a custom attribute) to create a Microsoft 365 group.
Example 2: All Employees Who Work in the Medical Center and Have Completed HIPAA Training
In this example, the organization has purchased some compliance training software that records training status in a custom attribute as part of an app registration. The example organization has employees working in a variety of locations and departments. We are particularly interested in those at the medical center.
In this tenant, the office attribute is set on all employees in the form of <Building Name> <Office Number>, such Hospital 123 or Administration 456.
Unfortunately, the compliance training software uses only a single attribute to store completion status for multiple training courses (Family Educational Rights and Privacy Act—FERPA, HIPAA, cybersecurity training, in-house policy training, etc.). The courses appear in no particular order and are not always present for a user within the attribute; for example:
“CYBER: YES”, “HIPPA: NO | CYBER: YES”, “CYBER: NO | HIPPA: YES"
As in the first example, create your dynamic membership group and click Add Dynamic Query.
Next, you need to add into the membership rules editor the application registration that contains the custom attribute(s) so that you can use it in creating the rule. Click “Get custom extension properties” and enter the app ID from the application. Click Refresh Properties.
The custom attribute is now available in the Property drop-down menu as:
extension_<appId>_<attributeName>
as the following screenshot shows.
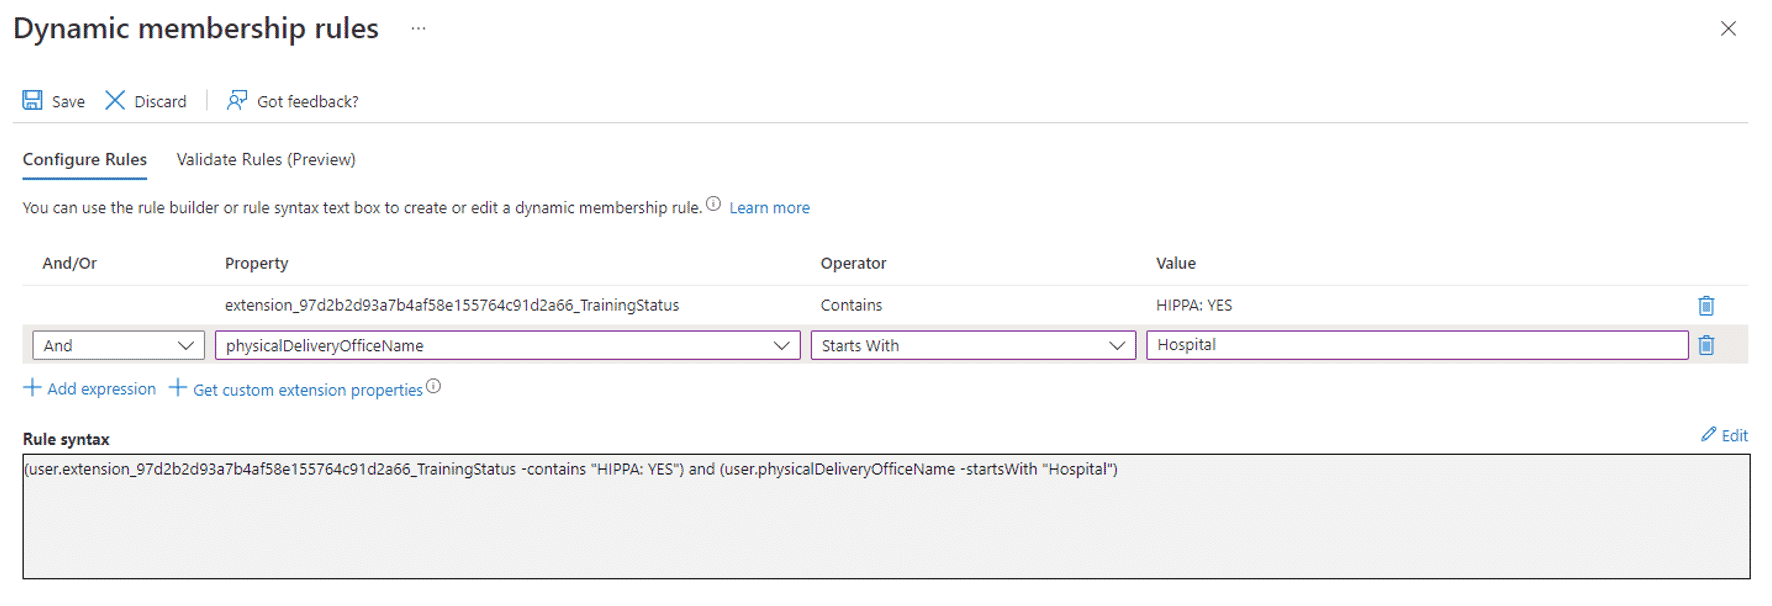
The rule looks for individuals with the attribute TrainingStatus containing “HIPAA: YES” and who are also in a building location starting with “Hospital.” Since the office locations (known in the drop-down menu as physicalDeliveryOfficeName) are a combination of building name and room number, we use the “Starts With” operator—but we could also use a regular expression with the -matches operator.
We can use the Validate Rules panel to make sure the rule is working as intended. You may want to find some examples of individuals who have completed the HIPAA training but work elsewhere, and vice versa. Fine-tuning your rules will be particularly important as they get more complex.
Create your group and wait for the initial processing to finish.
Validating the Group and Automatic Changes
After the initial processing has completed, you can use the group to drive access to specific resources. Just be careful switching over from a hand-maintained group because you might find, for example, that a few employees have lost access because they have not yet completed the training. But thanks to the dynamic membership rules, the group is automatically updated as the compliance software marks a user as having completed the training.
Entra ID periodically scans for any changes. In a smaller tenant, within a few minutes of completing the training a user will be added to the group. To help answer access questions, the audit logs can be helpful in troubleshooting when someone was added to or removed from the group. The following screenshot shows an example.
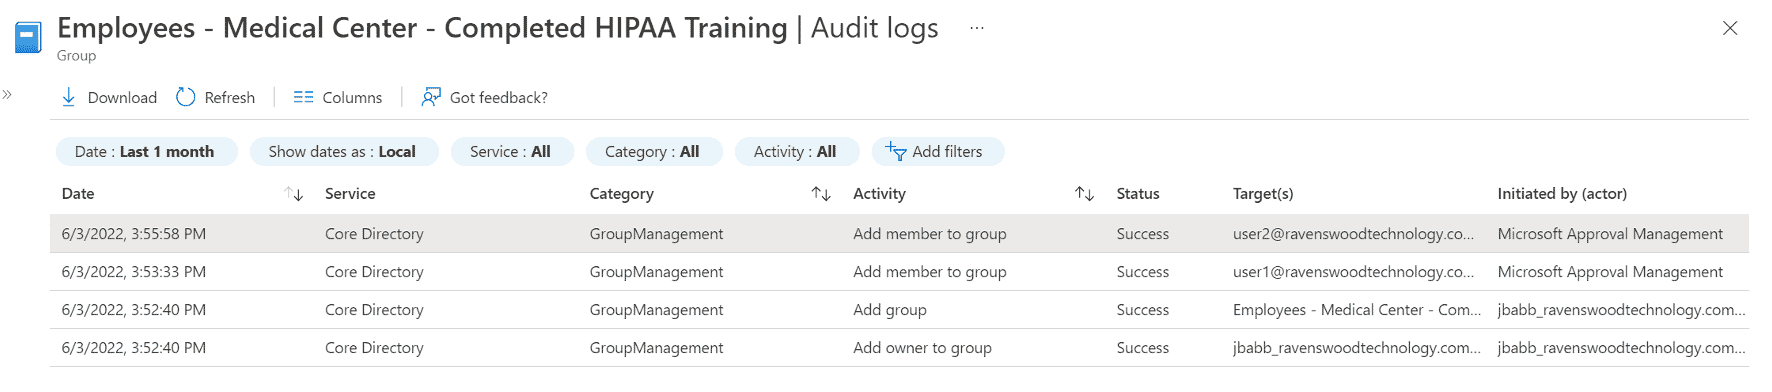
The group in the example above was created at 3:52 P.M., the initial refresh finished at 3:53 P.M., and user2 completed the training and was automatically added to the group at 3:55 P.M. You would see similar rows for removals from the group. If user2 had called the service desk at 3:54 P.M. to report that they could not access a resource, you would know the reason from looking at the audit log. You would also know that they would have had access starting at 3:55 P.M.
Using dynamic membership rules, you no longer need to worry about adding and removing employees from access groups as their mandatory trainings fall in and out of compliance. Additionally, if any of your employees change job locations, they will not retain access to resources simply because they completed the training. The combination of job location plus compliance training status controls their access.
Final Thoughts
As you can see from the examples in this blog, the automation possibilities are almost endless. Determining the business rules you want to implement around automated provisioning and de-provisioning of access to applications can be a daunting task. Fortunately, the experts at Ravenswood Technology Group have the business and technical expertise to help you make those decisions.
If your organization needs assistance in this area, we can walk you through the design and implementation of dynamic membership rules on groups in Entra ID. Or if you have an existing access control or grouping tool you would like to integrate with Entra ID, we are here to help. Contact our experts today!