


This blog post is a follow up to my previous post on leveraging Azure Blob Storage to serve HTTP certificate revocation lists (CRLs). If you have not already done so, you will want to check out that blog post first.

I have demonstrated how you can serve CRLs and CA certificates from Azure Blob Storage. As noted in my previous blog post, CRLs contain a list of the certificates revoked from the Certification Authority (CA). Since clients will recognize that a certificate is revoked only if it appears on the CRL, it is ideal for CRLs to have short lifespans and to be automatically published for client consumption. As failing to publish a CRL on time results in the inability for clients to process revocation information, manually publishing CRL files is unsustainable.
In an ideal state, the CRLs produced by the CA would automatically be uploaded and served to clients. This is the default behavior of an Active Directory Certificate Services (AD CS) issuing CA, automatically updating CRLs in Active Directory (AD) as part of CRL generation on the CA. There is not native integration between AD CS and Azure Blob Storage but thanks to a combination of PowerShell, Event Viewer, and scheduled tasks, you can accomplish reasonably robust CRL publication automation.
Solution Architecture
Partner with Microsoft experts you can trust
If it’s time to take that first step toward leveling up your organization’s security, get in touch with Ravenswood to start the conversation.
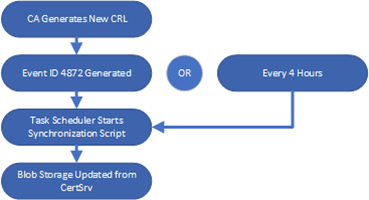
The solution relies on using a PowerShell script for CRL publication to Azure Blob Storage. This is accomplished by setting a scheduled task to trigger a synchronization script when Event Viewer logs that a new CRL was published. This ensures a CRL is copied to Azure Blob Storage as soon as it is generated. The synchronization script will also be configured to run on a schedule to ensure that even if Event ID 4872 fails to appear in the logs, the CRLs are still uploaded. Always remember that the entire functionality of the PKI relies on clients being able to check CRLs before the CRLs expire. Publishing CRLs as soon as they are generated and on a schedule ensures that when a certificate is revoked it appears on the published CRL for clients as quickly as possible.
Preparing the CA
By default, AD CS CAs do not have CA-related event logging turned on. You must enable Certificate Services event logging before event logs related to CRL publishing will appear. You can check to see if event logging for Certificate Services is enabled by running the following:
auditpol /get /subcategory:"Certification Services"
The CA is not currently configured for auditing. Auditing can be enabled by running:
auditpol /set /subcategory:"Certification Services" /success:enable /failure:enableIf you run the auditpol /get command again, you can see the results changing from No Auditing to Success and Failure, as shown in the image below.

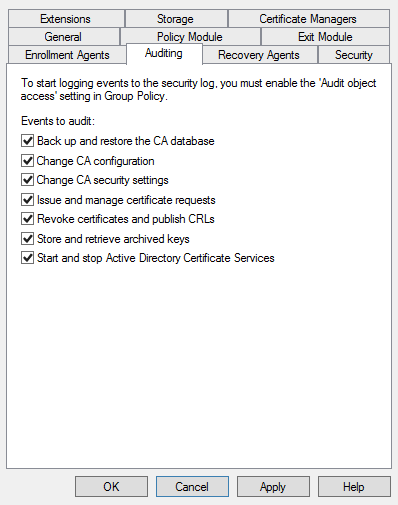
Auditing must also be enabled through the CA MMC. To see if auditing is enabled through the GUI, follow these steps:
- Open the Certification Authority MMC
- Right click the name of the CA and click Properties
- Select the Auditing tab
Review what is selected under Events to audit. By default, the check boxes are not selected. Enable all events to audit and click Apply.
Once the auditing settings have been updated, reboot the CA. After the CA is rebooted, you can manually publish a new CRL and confirm that you are collecting Event ID 4872 under Windows Logs > Security.
Once the auditing settings have been updated, reboot the CA. After the CA is rebooted, you can manually publish a new CRL and confirm that you are collecting Event ID 4872 under Windows Logs > Security.

Preparing to Write the Script
Once you have determined when CRLs are generated through Event Viewer, a PowerShell script can be leveraged to synchronize your CRLs from your CA to Azure Blob Storage. The script will require the following:
AzCopy
The script will need to leverage AzCopy and can leverage the portable executable Microsoft provides on the Microsoft Learn site as well as the official Azure GitHub. Save the portable executable on the CA and note its location for later use.
Shared Access Signature URL Token
The script will need to authenticate to Azure Blob Storage to make any changes. This can be accomplished using a Shared Access Signature (SAS) aka a SAS token. A new purpose-made SAS can be generated for this script. The SAS will take the form of a complex URL you need to define in the script. The token will eventually expire, and you must repeat this process prior to expiry. It is recommended to create the token with the same lifetime as the Root CA CRLs (if using a two-tier PKI) and rotate the token during the normal Root CA CRL publishing ceremony.
Note: Once a SAS token is created, it cannot be automatically tracked or revoked. Anyone with the generated token will have all permissions the token is configured with until it expires with no way to revoke it. Take special care in protecting the SAS token.
To generate a new SAS, you must do the following:
- Log in to Azure and navigate to Storage Accounts.
- Click the name of the storage account containing the Certificate Distribution Points (CDP) container created in the “Highly Available, Secure, and Convenient: Leveraging Azure Blob Storage for your PKI Needs, Part 1” blog post.
- Click Containers.
- Click cdp.
- Expand Settings.
- Click Shared access tokens.
Update the form to include the following:
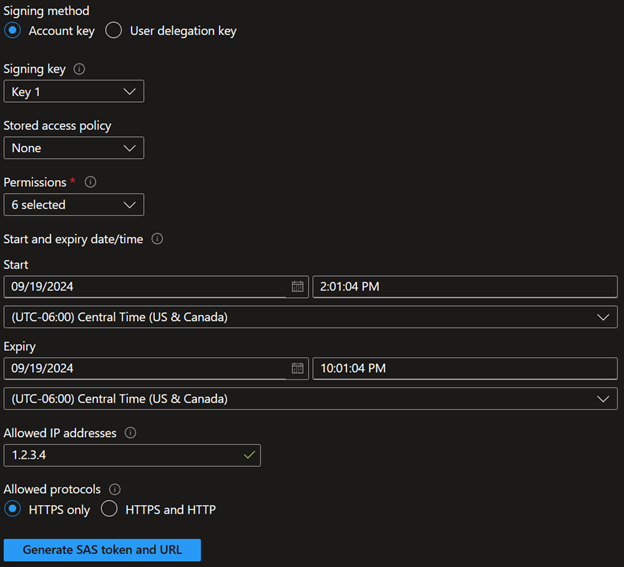
Then, review the completed form and click Generated SAS token and URL. Note the Blob SAS URL for later use in the script.
Writing the Script
Now that AzCopy and a SAS token are prepared, you can write the script to synchronize the CRL files to Azure Blob Storage. Sign in to the CA and open an administrative PowerShell ISE prompt. Then, copy and paste the following:
# Attempt to synchronize CRLs to Azure Blob Storage

# Define azcopy location to upload to blob storage
$azcopy = "C:\azcopy.exe"

# Define SAS URL to upload to blob storage [This will eventually expire!]
$CDPSASURL = "https://SAS URL GATHERED IN PREVIOUS STEP"

# Define CertEnroll Location
$CRLPath = "C:\Windows\System32\CertSrv\CertEnroll\"

# Gather .CRL Files
$CRLs = Get-ChildItem -Path $CRLPath -Filter *.crl

ForEach ($CRL in $CRLs) {
    # Upload the CRL
    $BlobUpload = &$azcopy copy $CRL.FullName $CDPSASURL --log-level="error" --check-length=false
}
Ensure the variables for $azcopy and $CDPSASURL are updated to the local path of the AzCopy executable and SAS URL, respectively.
Note that the script assumes your CRLs are generated with the same filename that clients will look for in their configured CDP extensions. Please refer to the first blog post in this series for a more detailed explanation of CDP extensions if needed.
At this point, when you run the script, you should see the CRL files in Azure Blob Storage replaced with the CRL files located in the native CertEnroll directory on the CA. The CRLs in Azure Blob Storage are effectively refreshed and are good to go until the next publishing.
Save the script and note the location for later use with your scheduled task.
Creating the Scheduled Task
All that’s left is to set up a scheduled task to automatically synchronize the CRL files. To complete the process, do the following:
- On the CA, open Task Scheduler.
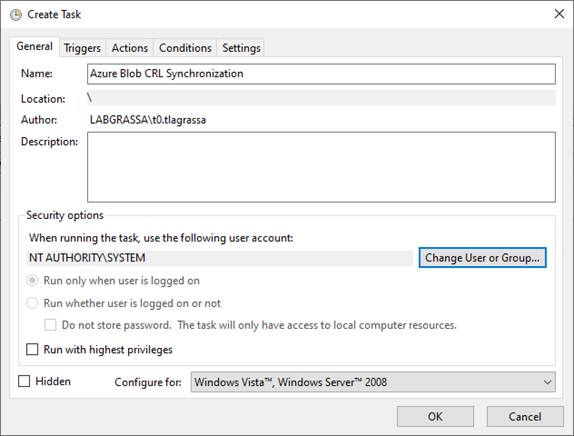
- Right click Task Scheduler Library and click Create Task…
- Give the task a meaningful name such as “Azure Blob CRL Synchronization”
- Click Change User or Group…
- Ensure the hostname of the CA is present in the From this location: field.
Enter the word SYSTEM and click Check Names. Click OK. - Verify the task will run as NT AUTHORITY\SYSTEM.
- Click Triggers
- Click New…
- On the Begin the task: dropdown, select On an event
- On the Log dropdown, select Security.
- In the Event ID field, enter 4872.
- Click OK.
- In the Triggers Pane, select New… again.
- Under Settings, select the Daily radio button.
- Click the Repeat task every: radio button and select 1 hour.
- Click OK.
- Click Actions.
- Click New.
- In the Program/script field, enter the following:
powershell.exe
- In the Add arguments (optional) field, enter the value below, updating to the path to point to where the synchronization script is saved.
-file "C:\path\to\synchronization\script.ps1"
- Click OK.
- Click OK to close the Create Task window.
- Now, you can manually check to see if the task works by right clicking the task name and clicking Run. Verify the task is working by making sure the Azure Blob Storage CRL files have a new timestamp and that CRL revocation checking works using the curtutil -url method used in the “Highly Available, Secure, and Convenient: Leveraging Azure Blob Storage for your PKI Needs, Part 1” blog post.
Conclusion
Next steps include manually publishing a CRL to ensure the scheduled task is properly kicking off automatically. There are still a few follow-up tasks to complete, including graceful removal of reliance on old CDP/AIA locations and adjusting the script for robust error handling and logging, which will be covered in future blog posts.
If you’re looking for advice on configuring or managing your PKI, reach out to Ravenswood today!