

Part 1 of this blog series discusses why using an app registration is a better option than using a service account for authentication in automated scripts. Now, let’s get into the details of how to create and configure an app registration for use with an automated PowerShell script.
The high-level steps involved are:
- Create the app registration.
- Assign the permissions.
- Create the self-signed certificate.
- Install the certificate in the app registration and the script host.
We’ll go into more detail about each of these steps below.
Create the App Registration
Like many things in Microsoft Azure, it’s possible to create an app registration with PowerShell. However, this technique is somewhat complicated and therefore not recommended when getting started.
An app registration is essentially two different objects: a service principal and an application. When you use PowerShell to create an app registration, you must create these objects separately and then link them. Alternatively, creating an app registration through the Azure Portal hides this complexity and is much simpler to accomplish.
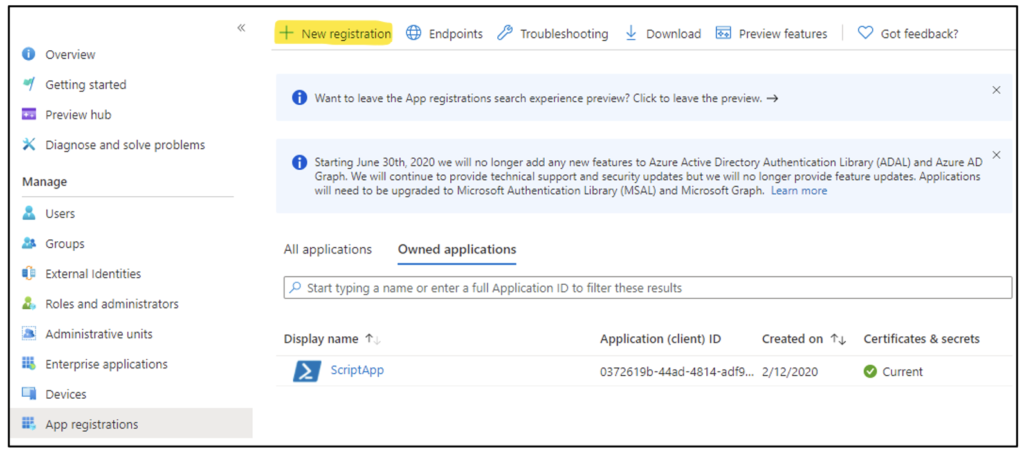
To create an app registration, log on to the Azure Portal with an account that has either the Global Administrator or Application Administrator role. Navigate to Entra ID (formerly Azure Active Directory) > App registrations > New registration, as Figure 1 shows.
In the dialog box that opens, enter the app name, as Figure 2 shows.
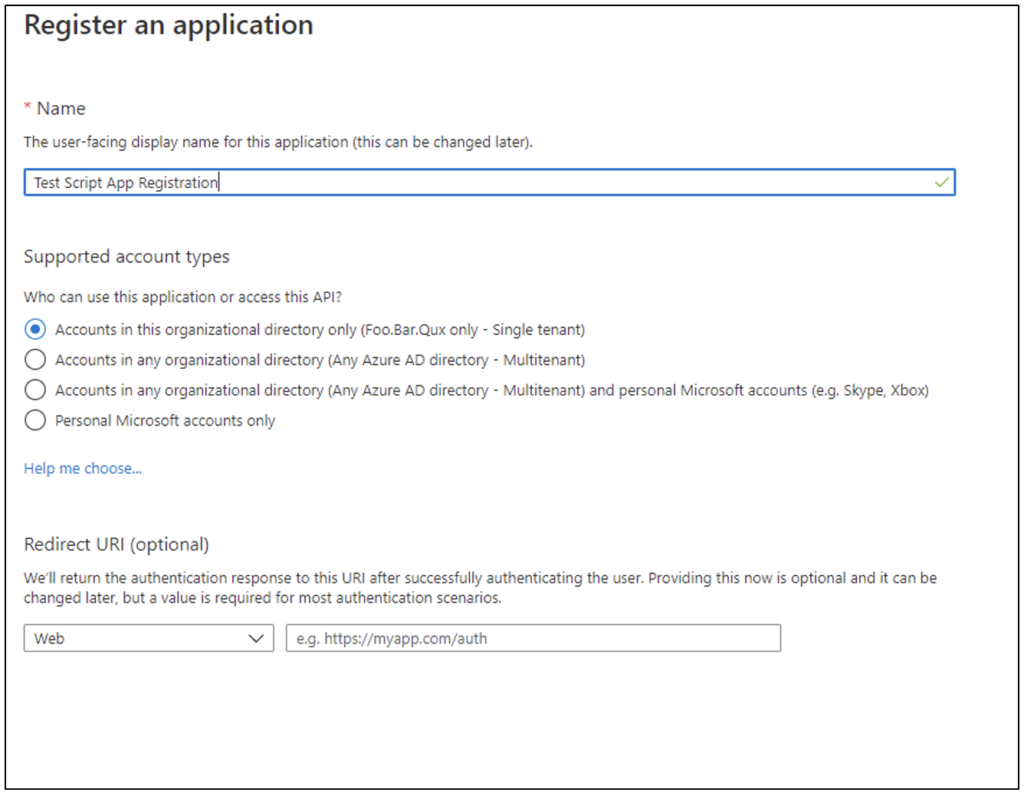
The name value is free text but should be descriptive enough to identify which script is using the app registration. The supported account type should be left as the default, because no users will be authenticating to the application—instead, the script will be authenticating as the app. The Redirect URL field isn’t used in this scenario.
If you have many scripts that need to be automated, it may be tempting to create a single app registration for all of them. This should be avoided for a couple of reasons:
- The app registration will need to be assigned permissions to support all the scripts, possibly resulting in scripts having access to permissions they don’t need and therefore providing escalation pathways.
- Having separate app registrations makes it possible to track different scripts’ sign-ins and actions (via auditing).
Assign the Permissions
Once an app registration is created, permissions need to be assigned so the scripts can perform the tasks required in Azure. Permissions can be assigned in two ways when authenticating as the app registration:
- The service principal assigned to the app registration can be directly added into an Azure role.
- The app registration can be assigned an application permission to an API.
Whether roles or API permissions (or both) are used depends on the PowerShell modules the script is leveraging; refer to the relevant modules’ documentation to determine the requirements.
The following sections detail the permission assignment process for both options.
Role Permissions
An app registration consists of an application object and a service principal. To grant an app registration role permissions, the service principal object is added to the role.
The process of adding a service principal to a role is the same as adding a user to a role—a process that should be very familiar to most Azure administrators. Service principals will simply show up in the “Select a member” pick list and can be selected as a user would.
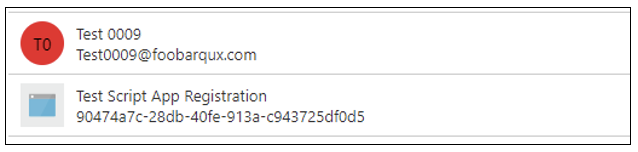
If the app registration was created through the Azure Portal, then the service principal associated with it should have the same name; it’s simply a matter of searching for and selecting it. If the service principal is named similarly to a regular user, it can be distinguished in the UI by the icon and a GUID where the UPN should be, as Figure 3 shows.
If there is any doubt, the service principal can be searched for directly in the pick list by using the “Application (client) ID” GUID obtained from the app registration overview, as Figure 4 shows.

A service principal cannot use Privileged Identity Management (PIM) in Azure to elevate into a role. All role assignments must be “Active”; the Azure portal UI will prevent the assignment from being set as “Eligible.”
API Permissions
API permissions may be less familiar to administrators who haven’t configured app registrations for other purposes or experimented with Microsoft Graph.
Configuring API permissions is a two-stage process: First the API permissions are assigned, then a Global Administrator must consent to them. This allows an Application Administrator (for example) to request permission for an application that the Global Administrator can then approve, rather than requiring the Global Administrator account to do all the application configuration.
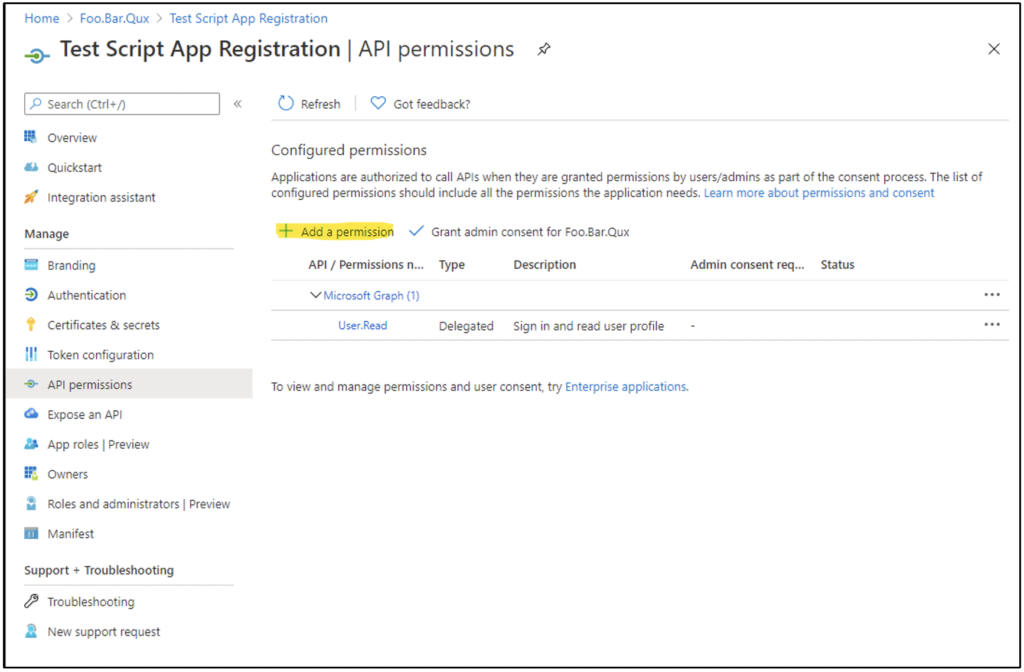
To assign API permissions, navigate to App Registrations > (App Name) > API permissions > Add a permission, as Figure 5 shows.
When the user clicks “Add a permission,” they are presented with a menu of different APIs for which permissions can be requested. When the user selects an API, they will be prompted to choose from “Delegated permissions” or “Application permissions,” as Figure 6 shows.
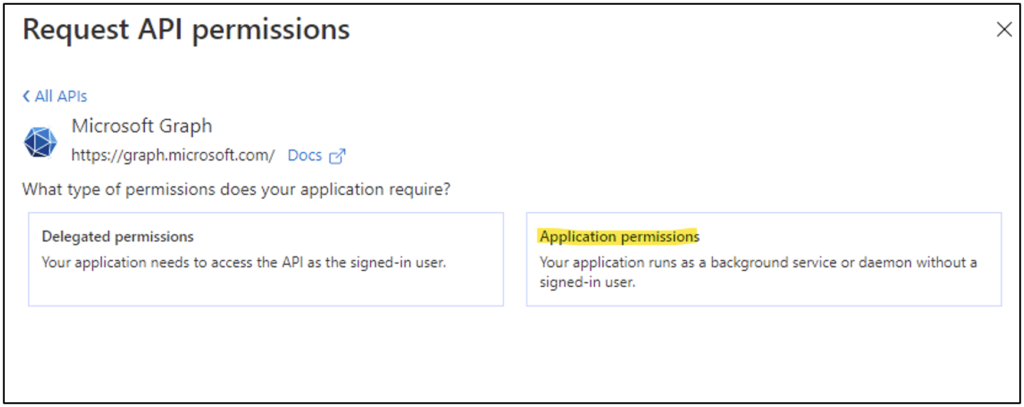
Delegated permissions work like the concept of Kerberos Constrained Delegation (KCD) in Active Directory. The application can act as the user authenticating to the app with respect to a specific permission. Since we aren’t authenticating to the application as a user but are instead authenticating as the application, these aren’t used—and “Application permissions” should be selected.
In most cases, the PowerShell module documentation should explicitly state which permissions from which API are required for the module, and the guides in the documentation should be followed. The Microsoft.Graph module is an exception in that the permissions for a given command must be obtained from the underlying Graph API call documentation.
For example, to use the Get-MgAuditLogSignIn cmdlet, we need to reference the documentation for the List signIns method, which has the Permission table shown in Figure 7.
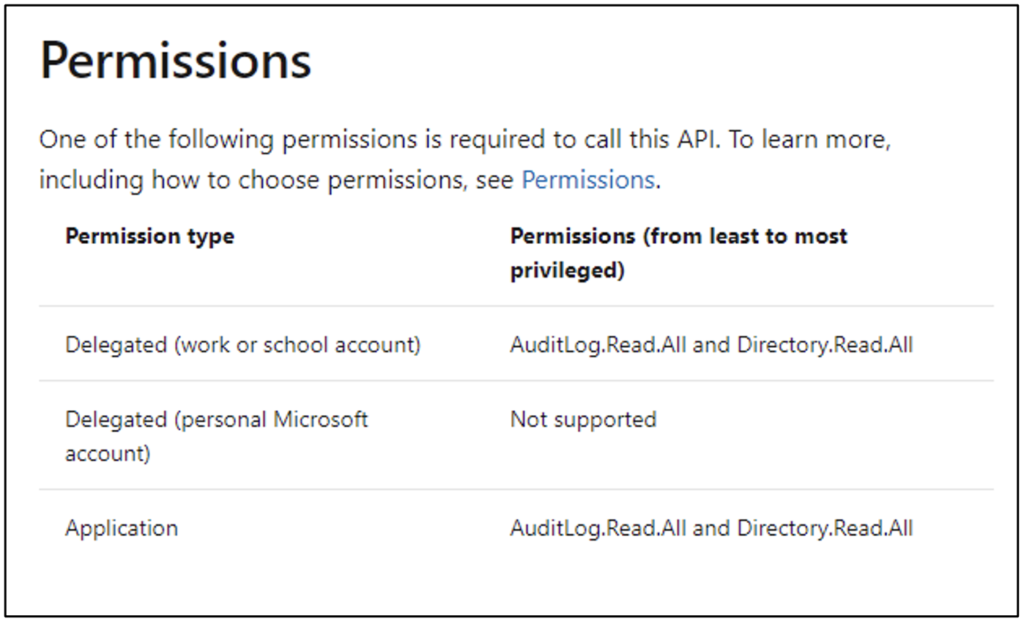
To enable this cmdlet to work with our automated script, the least privilege we need to grant is AuditLog.Read.All, as Figure 8 shows.
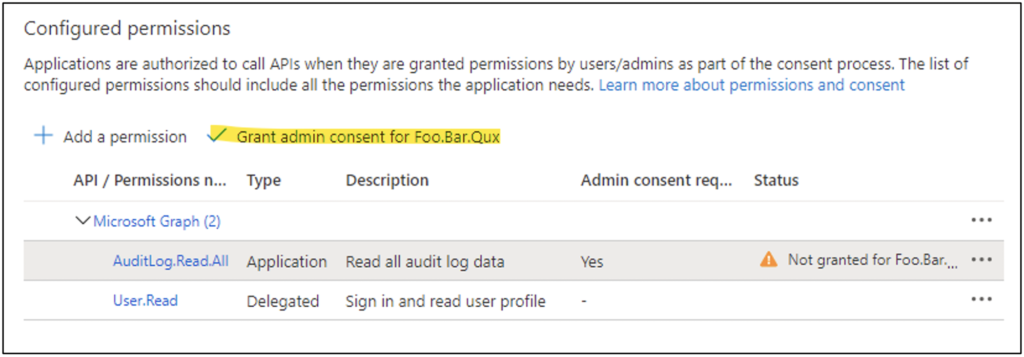
The User.Read Delegated permission is added by default when the app registration is created. Since it’s a delegated permission, we won’t be using it—so it can be removed.
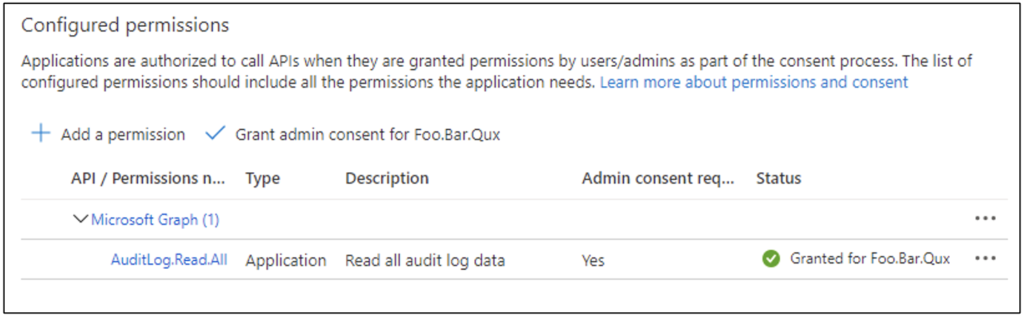
At this point the permissions have been added to the app registration, but admin consent hasn’t been granted. Therefore, the permissions won’t function for the script. A Global Administrator must click the “Grant admin consent” link as in Figure 8. Figure 9 shows the permissions granted.
Create a Self-Signed Certificate
The use of certificates often triggers concerns about complexity (“Implementing a PKI is hard”) or cost (“Public CA certificates are expensive”). In this case, however, the authentication model uses a “shared” certificate; both the app registration and the client (script) must be configured with access to the same certificate. The certificate is “trusted” because it has been installed on both ends, so neither a public CA certificate nor an internal PKI needs to be used.
Because of this, it is both possible and preferable to use self-signed certificates for authentication, which reduces the cost and complexity to nearly zero.
Much as with app registrations, it may be tempting to use the same certificate for multiple scripts; this temptation should be also be avoided, because it’s roughly equivalent to using the same password for multiple accounts AND letting everyone know you’re doing it. Any user with access to the certificate and private key would be able to trivially access any of the other app registrations used by other scripts and potentially obtain additional permissions.
There are many ways to generate self-signed certificates in Windows. The simplest is probably through PowerShell, with the New-SelfSignedCertificate command (also shown in Figure 10):
New-SelfSignedCertificate -Subject "Test Script App Registration" -CertStoreLocation Cert:\CurrentUser\My
Code language: PowerShell (powershell)
Because the certificate doesn’t need to correspond to a host name, there’s a lot of leeway in how the subject is assigned. Matching it to the app registration name (as shown in the example) would assist in tracking what the certificate is used for, although other naming conventions also have viability.
The New-SelfSignedCertificate command creates a certificate with a validity of one year. Other durations can be set by using the -NotAfter parameter. Since the certificate is essentially the authentication password, the validity period should align with whatever organizational policies exist for rotating application passwords.
Install the Certificate
The self-signed certificate needs to be installed in both the app registration and local Windows host that will be running the script. To do this, we need to export the certificate in two different formats: one with the private key and one without. This is illustrated in the following code and in Figure 11 using PowerShell but could also be accomplished using the Microsoft Management Console (MMC) Certificates snap-in.
Export-Certificate -Cert Cert:\CurrentUser\My\F88526EAE98C39A44477AB1105839111FE8B8BD5 -Type Cert -FilePath AppReg.cer
$password = ConvertTo-SecureString -String "CertificateSecretPassword" -Force -AsPlainText
Export-PfxCertificate -Password $password -Cert Cert:\CurrentUser\My\F88526EAE98C39A44477AB1105839111FE8B8BD5 -FilePath Host.pfx
Code language: PowerShell (powershell)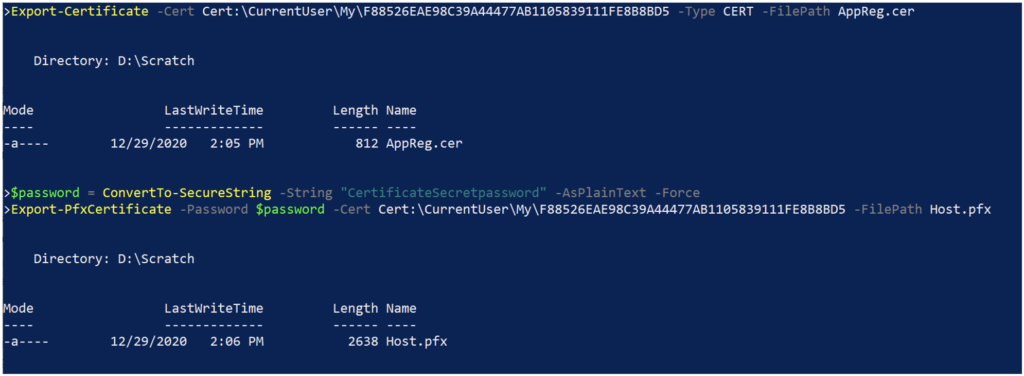
The .CER file doesn’t include the private key and will be used to load the certificate into the app registration. The .PFX file includes the private key (encrypted with the supplied password) and will be used to install the certificate on the host that will be running the script.
Once the files are generated, the certificate should be deleted from the machine it was created on, to remove the chance of the certificate being leaked from that location.
To upload the certificate to the app registration, navigate to Entra ID > App registrations > (App Registration Name) > Certificates & secrets, and select the “Upload certificate” link, as Figure 12 shows.

Select the .CER file that was previously generated to upload to the app registration.
On the Windows host that will be running the script, install the certificate using the .PFX file into the certificate store of the account the script will run under. This can be done with the MMC Certificates snap-in or using PowerShell, as illustrated in the following code and in Figure 13.
$password = ConvertTo-SecureString -String "CertificateSecretPassword" -Force -AsPlainText
Import-PfxCertificate -Password $password -FilePath .\Host.pfx -CertStoreLocation Cert:\CurrentUser\My
Code language: PowerShell (powershell)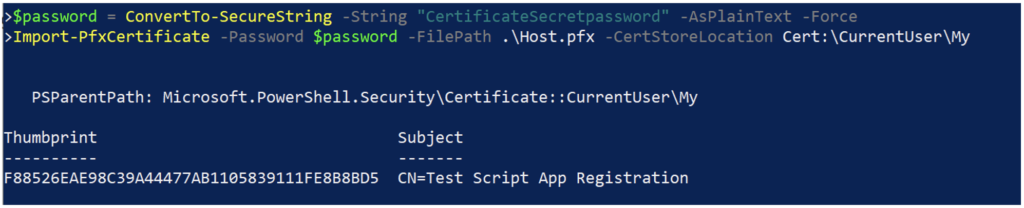
No matter the method used, the private key should be marked as non-exportable (the default) because this will make it more difficult to obtain the private key and certificate.
Once the certificate is installed on the script host, the .PFX file can be disposed of, which will remove easy access to the certificate’s private key. If the script needs to be installed on a separate host or under a different account context, it’s easier to generate a new certificate than to manage securely storing the .PFX files.
Test the Certificate Authentication
To test that certificate authentication has been correctly set up, start a PowerShell session on the script host in the context of the user account the script will run under. Then attempt to connect to Azure using the required PowerShell module or modules that will be used in the script. This is illustrated in the following code and in Figure 14 using the Microsoft.Graph module.
Connect-MgGraph -ClientId 90474a7c-28db-40fe-913a-c943725df0d5 -TenantId foobarqux.onmicrosoft.com -CertificateThumbprint F88526EAE98C39A44477AB1105839111FE8B8BD5
Get-MgAuditLogSignIn | Measure-Object
Code language: PowerShell (powershell)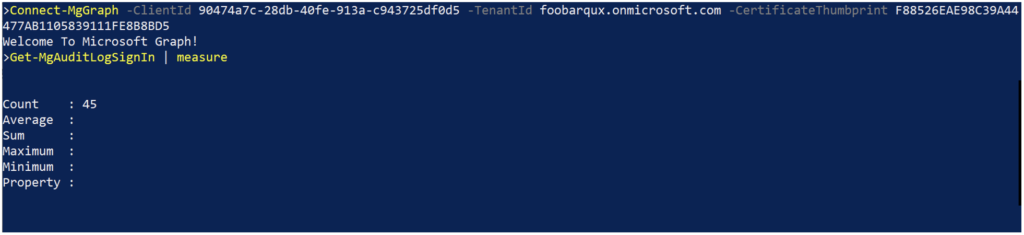
Connecting to Azure via certificate authentication to an app registration requires identifiers for:
- The tenant the app registration is hosted in
- The app registration itself
- The certificate used to authenticate to the app registration
Some variance exists among the various PowerShell module implementations in terms of how these parameters are handled, but in general:
- The tenant can be identified using either the GUID found on the Entra ID Overview pane or the onmicrosoft.com domain associated with the tenant.
- In most cases the parameter is called -TenantID.
- The app registration is identified by the GUID labeled “Application (client) ID” on the app registration overview pane.
- The parameter is either -ClientID or -ApplicationID.
- The certificate can typically be identified using the certificate thumbprint.
What’s Next?
The final post in this blog series will examine some of the other differences between using an app registration and a regular user account for authenticating to Azure in scripts.
In the meantime, if you need help with automating your PowerShell scripts or managing authentication – contact the experts at Ravenswood Technology.